Orders
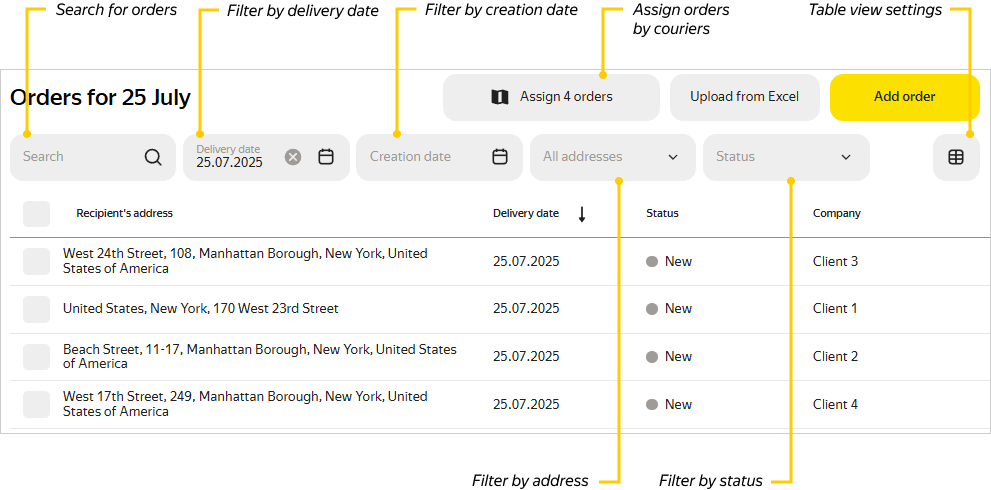
You can find a table with detailed order information in the Orders section. By default, this section shows orders for the current date. To see all orders, click ![]() in the Delivery date field.
in the Delivery date field.
Orders with inaccurate addresses are marked with . Orders with no address are marked with .
Here, you can:
- Import orders from Excel.
- Add an order manually.
- Search for orders.
- Filter orders by date, address, and status.
- Customize the table view.
- View order details.
- Edit orders.
- Run automatic route planning.
Look at the field names — they often tell you what to type in.
Full list of fields
- Recipient's address
- Delivery date
- Delivery time
- Service time
- Status
- Company
- Recipient
- Recipient's phone number
- Comments
- Order ID
- Weight
- Volume
- Creation date
Warning
With a trial subscription, you can:
- Create up to 30 orders per day.
- Add up to two couriers.
Import orders from Excel
Here's how to import orders from an Excel file:
-
Go to Orders.
-
Click Upload from Excel.
-
Download and fill out the template.
Make sure that the number of characters in the fields on the Orders sheet doesn't exceed the limit.
Fields with character limits
Field
Description
Character limit
refOrder number
1023
addressRecipient's address
1023
company_nameRecipient company
80
titleRecipient's name
80
phoneRecipient's phone number
80
commentsComment
1023
The rest of the fields don't have a character limit.
Note
In the
commentsfield, you can add a link that will be active when viewing the order in the mobile app. -
Select a delivery date for the orders.
-
Click Upload.
Alert
You can import up to 500 orders into one table.
In case of upload errors, download the file with errors, fix them, and upload the file once again.
Cells that contain errors are marked in red and accompanied by comments. You can filter the search results by color.
Common errors
-
The file contains more than 500 orders.
-
Invalid file format: only the
.xlsxand.xlsfile extensions are supported. -
The required Address field is empty.
-
Invalid cell format.
You can use the General cell format for all fields. To specify the time or date, you can use the Text, Time or Date cell formats.
-
The field format is invalid.
-
The column name is invalid. For example,
adressinstead ofaddress. -
The Orders sheet is missing from the file.
Add an order manually
-
Go to Orders.
-
Click Add order.
-
You can fill in the Address* field in one of the following ways:
-
Use the address book. After enabling it in the settings, you'll be able to select one of the saved addresses.
-
Type in the address.
-
Select the location on the map. The selected location will appear in the Address field.
You can move the order marker if needed, and the address will update automatically.
-
-
Fill in the following fields:
- Order number: If not specified, the number is assigned automatically.
- Delivery date: If not specified, the current date is used.
- Delivery time: Time interval in which the order can be fulfilled. If not specified, the default period 00:00–23:59 is used.
- Service duration: Time to complete the order. If not specified, the value from the company settings is used.
- Weight*: Order weight, kg.
- Volume*: Order volume, m3.
- Company: Company's name.
- Recipient: Recipient's name.
- Phone number: Recipient's phone number.
- Comments: Comments on the order. In this field, you can add a link that will be active when viewing the order in the mobile app.
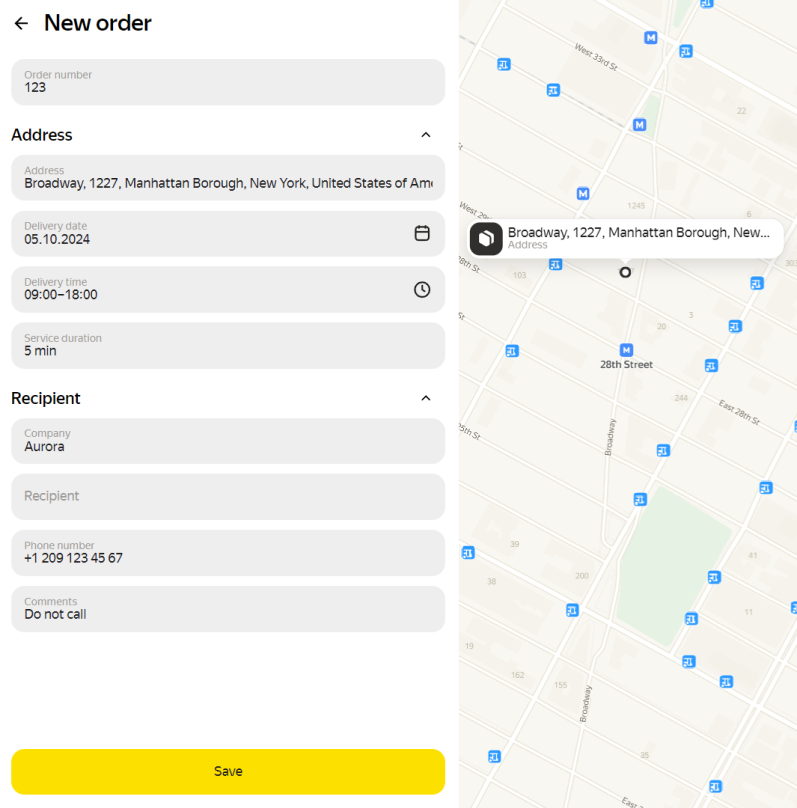
-
Click Save.
To add an order using the map:
-
Select the location on the map. The selected location will appear in the Address field.
-
You can move the order marker if needed, and the address will update automatically.
Format of the recipient's phone number
-
The phone number must consist of 3–14 digits.
-
You can specify multiple extension numbers for the phone number. To do this, use separators:
,,*, or#. The extension number can be 1 to 5 characters long. -
To specify multiple extension numbers, list them separated by
,or;. If one of the phone numbers contains an extension number separated by,, the phone numbers should be listed using;.
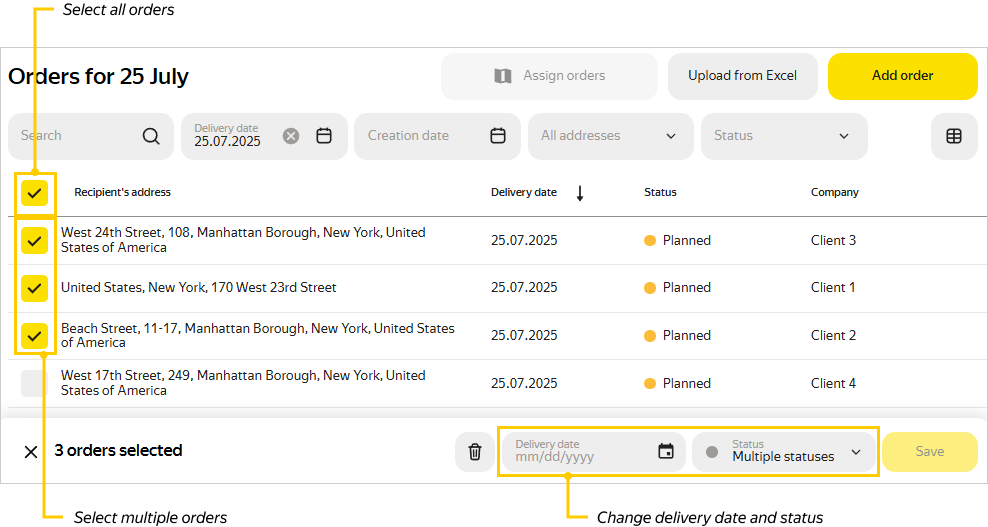
Working with the table
You can sort orders in the table by the Recipient's address, Delivery time, Company, Recipient, and Creation date columns. To do this, click the column name.
To search the table, enter your query in the Search field.
You can also filter orders:
- By creation date and delivery date
- You can apply these filters separately or together.
- By address
- Select one or both:
- No address: Orders where the recipient's address is not specified.
- Inaccurate address: Orders where the system could not locate the exact address.
- By status
- Select one or more order statuses.
You can distribute filtered orders among couriers using automatic route panning. To do this, click Assign
Order statuses
|
Status |
Condition for setting the status |
|
New |
Set automatically when an order is created. |
|
Planned |
The order is assigned to the route but not sent for processing yet. |
|
In progress |
Set automatically when the route is sent for processing. |
|
Cancelled |
Set manually if no further processing of the order is required. |
|
Not completed |
Set manually if the order couldn't be delivered. |
|
Finished |
Set manually if the order was delivered to the recipient. |
Order statuses in completed routes
In completed past-date routes, Not completed and In progress order statuses are changed to New. This way, the orders can be planned again. The orders' cards will have the Not completed earlier label.
The next time you plan a route, these orders will appear on the new route and will be stored in the completed route with the status Not completed.
Order card
Customize the column display
- Click
 .
. - Show or hide specific columns.
The Address field can't be hidden.
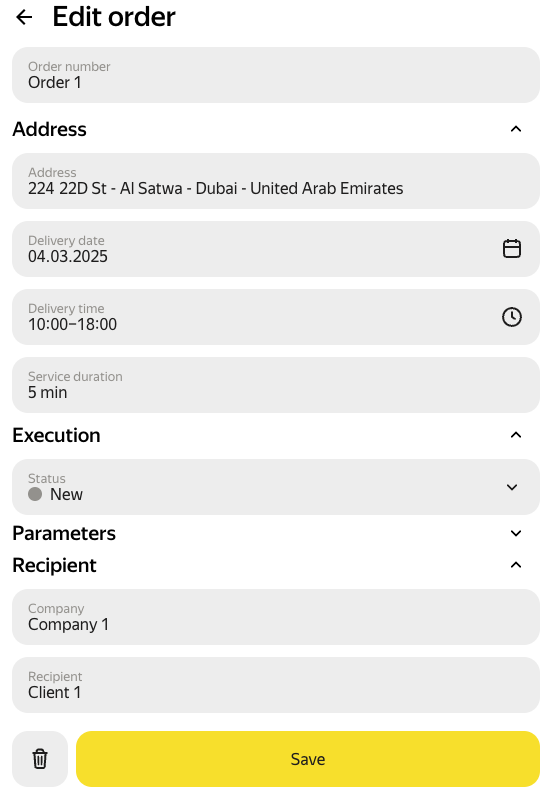
Edit orders
Note
You can only change delivery dates for orders with the New status.
For more information about editing certain fields for orders with the Planned status, see below.
To edit one order:
-
Go to Orders.
-
Select the order.
-
Enter the new value in the field you want to change.
-
Click Save.
To edit the order address on the map, move the order marker where it needs to be.
Things to remember when editing planned orders
When you edit orders with the Planned status, note the following:
-
Editing the values in the Address, Delivery time, and Service duration fields affects the route: it is re-plotted while preserving the sequence of order delivery. As a result, this new route isn't optimized.
-
Editing the values in the Order number, Company, Recipient, Phone number, and Comments fields doesn't affect the route. You can edit these fields without restrictions.
Editing delivery date
You can also change the delivery date for multiple orders at once if they haven't been planned yet. To do this, in the order table:
-
Select the orders.
-
In the lower-right corner, click Delivery date.
-
Select a date.
-
Click Save.
The delivery date won't be changed for Planned orders.
Updating an order status
Note
If the order hasn't been assigned to a route, you can switch its status form New to Cancelled. After the order has been assigned, you can change its status between Finished, Not completed, Cancelled, and In progress.
You can change the status for multiple orders at once. To do this, in the order table:
-
Select the orders.
-
In the lower-right corner, click Status.
-
Select the status.
-
Click Save.
Delete orders
Alert
You can delete New unplanned orders only.
To delete orders:
-
Go to Orders.
-
Select the orders.
-
In the lower-right corner, click .
You can also delete an order while editing it. To do this, click → Delete in the order card.
Required field.
Available if Capacity is enabled in the company settings.