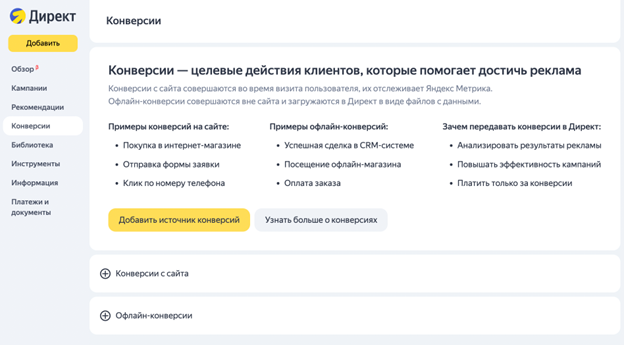
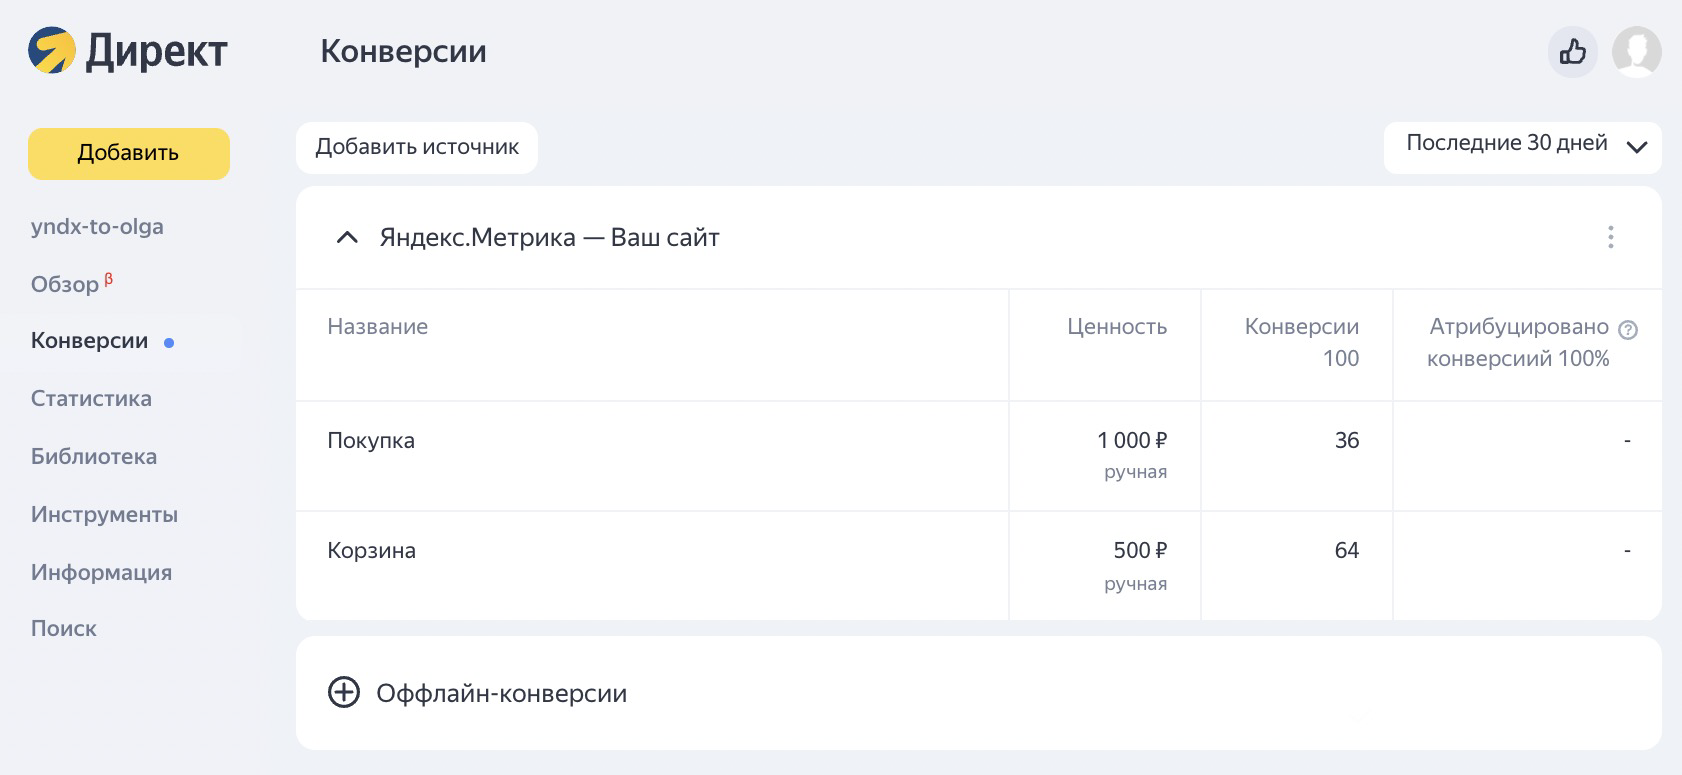
Conversion center
Upload conversion data to take it into account when setting up campaigns. Collect all conversion data from all sources and analyze the big picture:
- Which offline or call conversions were brought by Yandex Direct ads?
- What was the cost of conversions brought by Yandex Direct?
All this information is available in the Conversion center: this is your one-stop shop for managing offline, online, and call conversions. In this window, you can:
-
Upload your offline, online, and call conversions using alternative ways of sending data. This will complement your conversion data stored in Yandex Metrica. Learn more about uploading offline conversions and call conversions.
-
Track statistics for the conversions uploaded by the alternative methods, over the API or using connectors. You can export all your Yandex Metrica data to Yandex Direct.
To go to the Conversion center. In the menu, select Conversions.
Uploading conversion data
You can export your conversion data from the CRM database to a CSV file and add it to the Conversion center using alternative upload methods: from an FTP or SFTP server, by an HTTP or HTTPS link, or using Google Sheets. From the Conversion center, the data will be sent to Yandex Metrica where it'll be used for generating conversions and goals.
Statistics and goal optimization will be available to all Yandex Direct usernames that have access to the Metrica tag to which the data is uploaded.
The upload process consists of three steps:
- Create a file with data in the standard format.
- Upload the file to the source.
- Add a link to the source.
Stage 1. Preparing the file
Create a CSV file. Use a semicolon to separate columns in a CSV file. For example:
id;create_date_time;client_uniq_id;client_ids;emails;phones;order_status;revenue
Name and description of fields:
Conversion date and time. Required field
|
Name |
Description |
Notes |
|
create_date_time |
The date and time when the order was created in the tag's time zone. This value can't be changed. |
Specify the date and time. If you don't store the conversion time in your CRM, send only the conversion date. We will add the time of 23:59:59 to each of your conversions. This way we can attribute all conversions that occurred on that day before 23:59:59 to individual sessions. Learn more about the date and time format. |
User IDs. At least one of the fields is required
|
Name |
Description |
Notes |
|
client_ids |
ClientID list. For more information, see |
For transmitting online orders, set up the data collection and transmit the ClientID. This enables you to attribute all your online conversions. |
|
emails |
A list of the client's email addresses. A Latin string that includes the @ character and the domain name. Avoid uppercase letters. Example: To transmit multiple values, enclose them in double quotes and separate them by a comma without a space. For example: |
If you use an invalid format for email addresses, we won't be able to attribute conversions to sessions. |
|
phones |
A list of the customer's phone numbers. To transmit multiple values, enclose them in double quotes and separate them by a comma without a space. Example: |
If you use an invalid format for phone numbers, we won't be able to attribute conversions to sessions. |
|
emails_md5 |
|
|
A list of the client's MD5-hashed email addresses. Before the hashing, email addresses must be in the above-specified format. To transmit multiple values, generate a hash for each email address individually, enclose each hash in double quotes, and separate them with commas without spaces. Example: |
If you apply the hash to ill-formatted email addresses, we won't be able to attribute conversions to sessions. To check your hashing algorithm, you can use the Its hash should be: |
|
phones_md5 |
|
|
A list of the client's MD5-hashed phone numbers. Before the hashing, phone numbers must be in the above-specified format. To transmit multiple values, generate a hash for each phone number individually, enclose each hash in double quotes, and separate them with commas without spaces. Example: |
If you hash phone numbers in an invalid format, we won't be able to attribute conversions to sessions. To check your hashing algorithm, you can use the Its hash should be: |
Note
In Google Sheets, you don't need to manually add quotation marks to your data — they're added automatically when you download the file.
Optional fields
|
Name |
Description |
Notes |
|
id |
The ID of the order in your CRM. Arbitrary value. |
Transmitting the id allows you to:
|
|
client_uniq_id |
The ID of your customer in the CRM that is linked to the order. |
If you add or change the ID of your customer, then you can use client_uniq_id to merge the customer's future orders with their past orders. Otherwise, you'll have two different customers. |
|
order_status |
Type of the order status. You can change the status. Values must be specified in uppercase letters only. Fixed status list:
You can also use a JavaScript goal ID as the status. Learn more |
Conversions with the IN_PROGRESS status will be added to the “CRM: Order created” goal. Conversions with the PAID status are added to the goal “CRM: Order paid”. If you send orders only with the PAID status, such conversions will be added to both goals: “CRM: Order created” and “CRM: Order paid”. If the conversion status is not specified, then all conversions will be assigned the PAID status, and such conversions will be added to both goals: “CRM: Order created” and “CRM: Order paid”. If you transmit orders with the SPAM and CANCELLED statuses, you can create segments for users who have made such orders. You can collect Lal (Look-alike — a segment of similar users) and use the segment in adjustments in the campaign. To make sure that the order status is updated successfully, send the order ID from CRM in the upload. If you use a JavaScript goal ID as the status, the conversion is added for the goal with the selected ID. |
|
revenue |
Revenue. The final price of the order. A decimal value. Use a dot to separate whole and fractional parts. For example: 1508.50. |
Transmit the revenue from your order. This value will be used in end-to-end analytics reports to show how much money you earned from orders from your promotional channels. The value will be shown in the “Revenue” metric. |
|
cost |
The cost of the order. A decimal value. |
Transmit the cost of your orders to see profits in your end-to-end analytics reports. The profit will be calculated by the Revenue - Cost formula. |
Stage 2. Uploading a file to the source
Configure the data upload to any of the suitable sources:
- FTP server.
- SFTP server.
- HTTP/HTTPS link.
- Google Sheets.
When optimizing promotions based on conversions from a file, there are two rules you should follow:
- Add new conversions to the file in real time or at least once a day.
- Be sure that the file includes up-to-date conversions over the previous three days.
By following these rules, you ensure that the strategy algorithms receive signals about the completed goals at a minimal delay and can timely change the bids in your campaigns.
Stage 3. Adding a link to the source
-
Go to the Conversions page, then click Add a conversion source.
-
Select a source for the upload:
File by link
- Enter the name of the source.
- Add a link to the conversion file.
- Select the Yandex Metrica tag from the list for data upload: the Yandex Direct username you add the source from and the username of the chief representative, if you add from the representative's username, must have access to edit the tag.
- If needed, specify the value of conversions. For example, set it manually. If you enter your conversion revenue in the file, select the value “From file”.
File over FTP
-
Enter the name of the source.
-
Add the server username and password so that the Yandex Metrica's robot can collect the data.
-
Enter the port and host.
-
In the Path to the file on the server field, enter a link to the file on the server for the username specified in the source settings.
To determine the file path, use any FTP client. Enter your username and connect to your server.
The path should start with “/”. For example:
/file_name.csv/folder_name/file_name.csv
To test the path, download the file along this path using your FTP client.
-
Select the Yandex Metrica tag from the list for data upload: the Yandex Direct username you add the source from and the username of the chief representative, if you add from the representative's username, must have access to edit the tag.
-
Enable if the protocol is secure.
-
If needed, specify the value of conversions. For example, set it manually. If you enter your conversion revenue in the file, select the value “From file”.
File over SFTP
-
Enter the name of the source.
-
Add the server username and password so that the Yandex Metrica's robot can collect the data.
-
Enter the port and host.
-
In the Path to the file on the server field, enter a link to the file on the server for the username specified in the source settings.
To determine the file path, use any SFTP client. Enter your username and connect to your server.
The path should start with “/”. For example:
/file_name.csv/folder_name/file_name.csv
To test the path, download the file at this path using your SFTP client.
-
Select the Yandex Metrica tag from the list for data upload: the Yandex Direct username you add the source from and the username of the chief representative, if you add from the representative's username, must have access to edit the tag.
-
If needed, specify the value of conversions. For example, set it manually. If you enter your conversion revenue in the file, select the value “From file”.
Google Sheets
Alert
Grant the “View” access to the spreadsheet for the account import@yandex-direct-conversions.iam.gserviceaccount.com. For secure data storage, restrict access to the spreadsheet.
Make sure that the data you need to transmit is on the first tab of the spreadsheet.
-
Enter the name of the source.
-
Specify a link to Google Sheets.
-
Select the Yandex Metrica tag from the list for data upload: the Yandex Direct username you add the source from and the username of the chief representative, if you add from the representative's username, must have access to edit the tag.
-
If needed, specify the value of conversions. For example, set it manually. If you enter your conversion revenue in the file, select the value “From file”.
It's enough to add a conversion source only on one Yandex Direct username. After you upload the data, the goals created in Yandex Metrica will be available on all Yandex Direct usernames that have access to the Yandex Metrica tag to which the conversions were uploaded.
Using JavaScript goal IDs as the order status
In the “order_status” column, in addition to the fixed statuses PAID, IN_PROGRESS, CANCELLED, and SPAM, you can use a JavaScript goal ID.
An ID is a condition that should trigger the goal you're setting up.
To use an ID as the status, create a separate Yandex Metrica goal for uploading conversion data: Yandex Metrica → Goals → Add goal.
-
Enter a name for the goal.
-
Under Condition type, select JavaScript event.
-
In the Goal ID field, select matches and specify an ID that won't be triggered by on-site actions.
You'll use this ID as the status when sending conversions through the Conversion Center.
-
We recommend leaving the Revenue field empty.
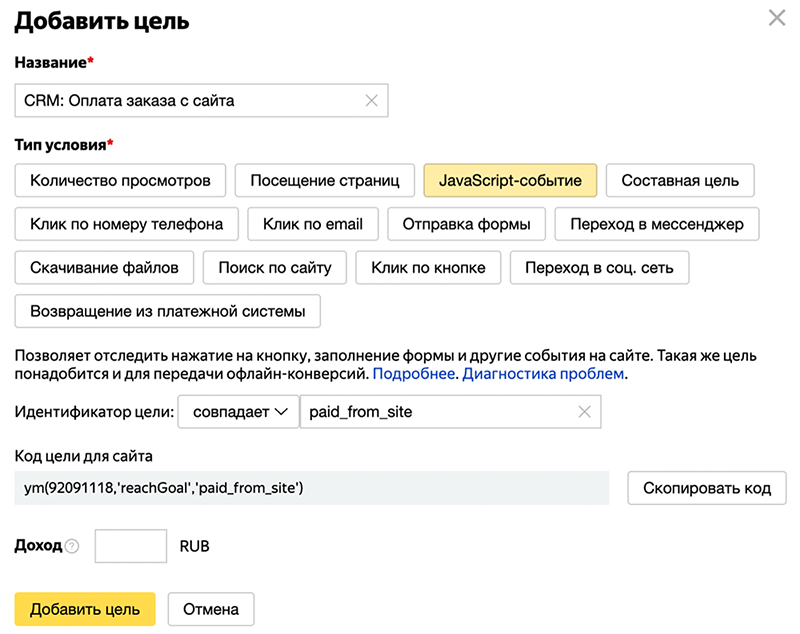
In the conversion file, in the “order_status” column, specify the goal ID from the “Description” column
Order statuses are case sensitive. If you created a goal with the ID “paid_from_site”, the ID in the file must also be “paid_from_site”. If you created a goal with the ID “paid_from_site”, but the ID in the file is different (for example, “PAID_FROM_SITE”), orders with this status won't be attributed to the session.
Windows for attributing conversions to sessions and changing conversion information
The attribution window for linking a conversion to a session is 21 days. This means that the conversion data won't be added to the session data if the conversion took place later than 21 days since the latest site session.

Once a conversion is attributed to a session, you'll have 90 additional days after the end date of the 21-day attribution window to fix or update this conversion. This might be the case when you need to change the conversion revenue after the order is paid and change the conversion status from IN_PROGRESS to PAID.

How do I check that everything is running properly?
-
If you transmit both online and offline orders, make sure that your final selection includes both order types. To do this, take a few specific orders (online, offline, and calls) and double-check that they have been added to the selection along with relevant contact details. You are having problems with your selection, if all its orders:
-
Have ClientIDs (no offline orders were added).
-
Don't have any ClientID (attribution of online orders will be much worse than it could have been).
Learn more about the attribution quality.
-
-
Make sure that the selection is updated at least once a day. The Conversion center checks when your file was last updated and downloads it if it has been changed.
-
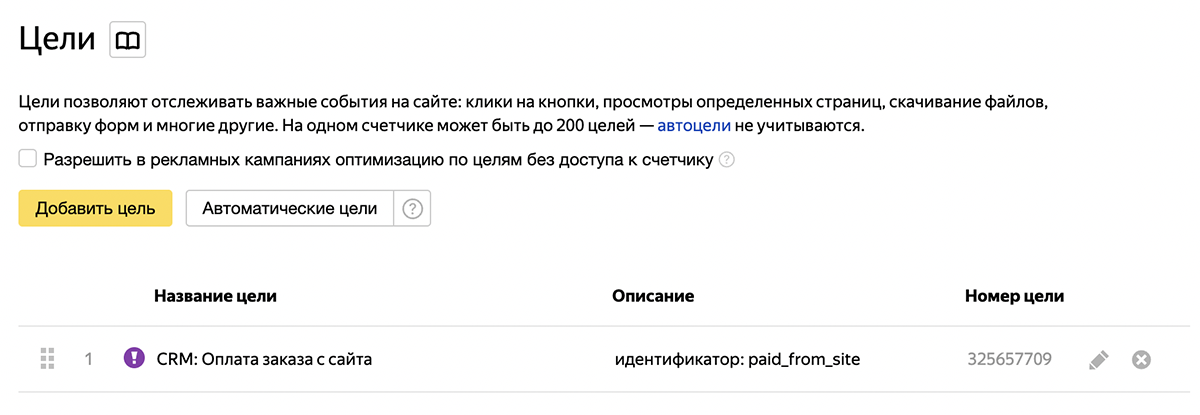
If you use fixed IDs (such as IN_PROGRESS or PAID) as order statuses, go to Yandex Metrica within 24 hours after the first upload: you should see two new goals under Conversions:
-
CRM: Order created.
-
CRM: Order paid.

If the goals were created, it means that the file validation was successful. In the statistics, you'll see the conversions that were attributed to sessions during the 21-day window.
-
Orders with the
IN_PROGRESSandPAIDstatus is assigned to CRM: Order created (if no order with theIN_PROGRESSstatus was previously sent). -
Under CRM: Order paid, you are collecting orders with the
PAIDstatus.
-
-
If you use a JavaScript goal ID as the order status, go to Yandex Metrica within 24 hours after the first upload: there should be statistics for the goal under Conversions.
-
To make sure that the order status is updated successfully, send the order ID from CRM in the upload.
If there are no conversions created in Yandex Metrica or an error bar appears in the Conversion center within 24 hours, it means there was an error in the file itself or in the source settings. Learn about the most common errors in the "Loading errors" section.
Loading errors
If you see a red bar when adding a source to the Conversion center, it means that the data file failed to upload. It means that there's an error in the file or in the source settings. Read the error text on the bar and follow a solution from the list:
Error connecting to the server. Check your connection settings
Make sure that the server data is correct: check the port, host, and path to the file on the server.
You don't have permission to write data to the Yandex Metrica tag. Request permission or try connecting from another account
Make sure that the Yandex Direct username that you use to add the source to the Conversion center has edit access to the Yandex Metrica tag specified in the source settings. If you are adding a source from a representative's username, make sure that the username of the chief representative has access to edit the tag.
Error downloading the file. Check your connection settings
Make sure that all data specified in the source settings is correct. Try to download the file yourself using the link or from the FTP server that you specified.
Invalid server authentication credentials. Check your connection settings
Make sure that you have entered the correct username and password to the server.
Invalid delimiter in the file. Check the file and update it
Use a semicolon to separate columns in CSV file. For example: id;create_date_time;client_uniq_id;client_ids;emails;phones;order_status;revenue.
To transmit multiple values in one column, enclose them in double quotation marks and use a comma without a space to separate them. For example, "79876543210,79991234567".
No valid data found in the file. Check the file and update it
Check that the column names, date and time format, phone numbers, and email addresses are correct.
Insufficient rights to download the file. Check your connection settings
Grant the “View” access to the spreadsheet for the account import@yandex-direct-conversions.iam.gserviceaccount.com. For secure data storage, restrict access to the spreadsheet.
The file is too large, the maximum size is 300 MB
Upload a smaller file. If you are uploading for the first time, just send the conversions that you received yesterday.
Unsupported file encoding. Only UTF-8 encoding is supported
Change the encoding of the file.
The table can include only one sheet. Check the table and update it
The table cannot contain more than one sheet. Move all the data in the table to one sheet and delete the rest. Update the file on the source.
Internal error downloading the file. Contact support to solve the issue
Unknown error. Contact your personal manager or the support service.
Errors in the file
Once you have uploaded the data from the source to the conversion center, you might get a file with errors. This means that some data in the source was invalid. These errors are collected in the file. The ways to resolve them are given in the table.
|
Invalid date format '<date_string>' |
The date and time in the create_date_time column have invalid format. Revise the format as shown in the example. |
|
Empty 'create_date_time' value |
No date and time in the create_date_time column. create_date_time is a required column. Specify date and time in the relevant format. |
|
'create_date_time' is older than 113 days |
The date in the create_date_time column is beyond the time limit. Delete the conversions older than 113 days from the file. |
|
'create_date_time' is from the future |
The date in the create_date_time column is later than the current time. This data can only be uploaded tomorrow. |
|
Invalid '<id_type>' identifier '<id_value>' |
An invalid value has been found in the column with IDs. Specify the user ID in the correct format. Learn more about the phone number and email format. Clientid must be specified as a positive integer |
|
All columns with identifiers are empty |
The ID columns are empty. Fill in one of the required ID columns: client_ids, emails, phones, emails_md5, phones_md5. |
|
Invalid '<revenue/cost>' value |
You have an invalid value in the revenue/cost column. Use a positive number as revenue/cost. |
|
'<revenue/cost>' value must be nonnegative |
The revenue/cost column includes a negative number. Use a positive number in revenue/cost |
|
'<revenue/cost>' value must not exceed 9223372036854 |
The number in the revenue/cost column is too large. Use a number that is less than 9223372036854. |
|
Invalid 'order_status' value |
order_status is invalid. Use the order statuses listed below:
If you're using a JavaScript goal ID, make sure that the goal specified in the file actually exists and that the capitalization of its ID matches the goal created in Yandex Metrica. Order statuses are case sensitive. |
Conversion statistics
In the Conversion center, you can track statistics on the completion of goals that were previously created in Yandex Metrica.
For example, this is useful if you run ads in several usernames and want to see the conversion statistics on all usernames. Instead of adding a conversion source to each Yandex Direct username, add it to one username, upload the data about the created Yandex Metrica goals on all the other usernames, and track statistics on the completion of goals:
-
On the Conversions page, click Add a conversion source. Select Yandex Metrica.
-
Select the Yandex Metrica tag for which you uploaded the data on offline conversions and call conversions. If the tag isn't in the list, ask the tag owner to allow access for your username.
-
Select the goals available on the tag. If revenue transmission isn't configured for the goals, set the value manually.
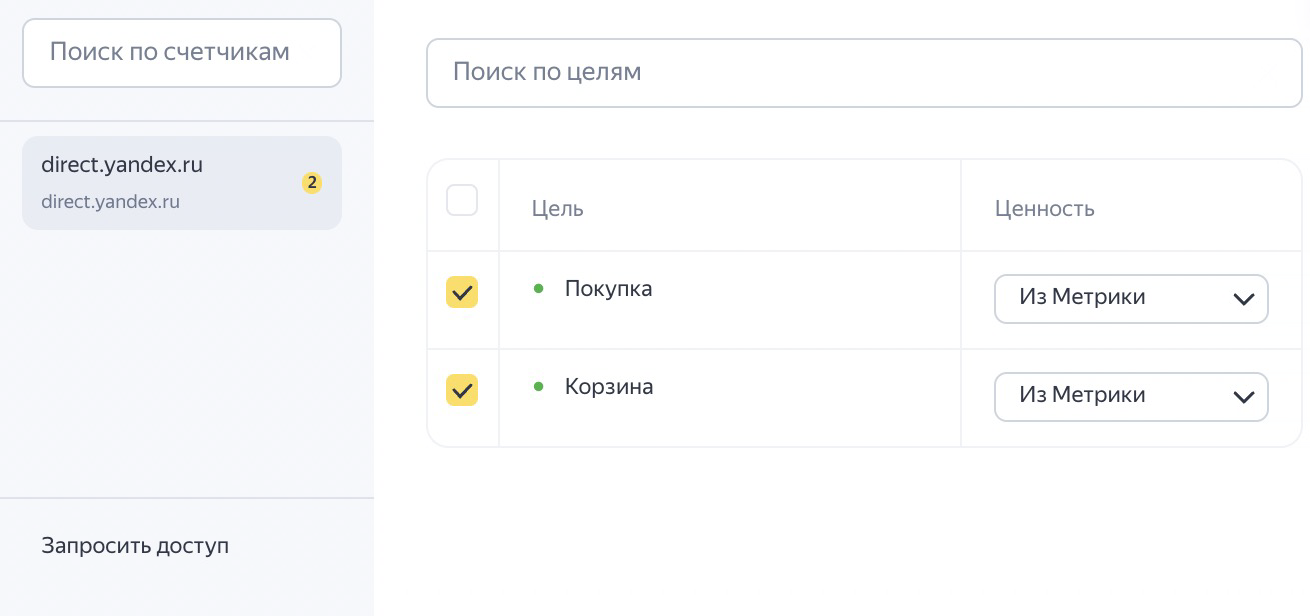
As a result, a report with the data on goals will be generated:
- Conversions: The total number of sessions converted for this goal based on all sources in Yandex Metrica.
- Conversion from Yandex Direct: The total number and percentage of conversions that resulted from users clicking through to your site from campaigns placed in Yandex Direct.
Have questions?
Alert
Our customer support can only assist you with campaigns linked to the username you are contacting us from. You can check your username by opening ya.ru in another browser tab. Our team can access your data only when processing your request.
Scan the QR code or tap it to follow the link.


If you select Telegram or WhatsApp, keep in mind that Yandex does not control and is not liable for how third-party messengers store your data and chat history.