Configure auto actions
To integrate your form with other services, you can configure one or more actions to be performed automatically when the user submits a completed form.
You can set up multiple automated actions for each form and set conditions for performing those actions depending on user answers to the questions.
You can see a history of completed actions on the Completed integrations page.
Integration with Wiki and Tracker is only available to users of Yandex Forms for Business.
Add actions
-
Select the desired form and open the Integration tab.
-
Add a new group of actions or use an existing one. You can add multiple actions to the group and set shared conditions for them.
By default, a group with one action — sending an email — is set up for all forms. This group is enabled, and you can disable or delete it or add custom actions to it.
-
To create a new group, click Add action group at the bottom of the page.
-
To create a group of actions based on an existing one, click in the upper-right corner and select Copy group of actions . Next, edit the copy.
-
To enable or disable a group of actions, use the toggle in the upper-right corner.
-
To delete a group of actions, click in the upper-right corner and select Delete group of actions.
-
-
If necessary, set up action conditions for the group.
To configure multiple actions to be performed under different conditions, add multiple groups. -
To add an action to a group, click a button at the bottom of the group:
-
To send a notification by email, click
 Mail.
Mail. -
To create an issue in Yandex Tracker, click
 Tracker: Creating an issue in Yandex Tracker.
 -
To add a comment to a Tracker issue, click Tracker and select Tracker. Comment on task: Add a comment to a Tracker issue.
-
To add user answers to a Wiki page, click
 Wiki: Adding a response to Wiki.
 -
To send an HTTP request, click
 API and select the request type: Sending an HTTP request.
Integration with Wiki and Tracker is only available to users of Yandex Forms for Business.
-
-
Set up the action and click Save.
-
To disable an action, use the toggle in the upper-right corner.
-
To delete the action click and select Delete.
To return to the question settings, select the Form builder tab at the top of the page.
Setting conditions
You can set conditions for integrating your form with other services. Actions such as sending notifications or creating issues will only be performed when the specified conditions are met. To set up conditions for actions:
-
Select the form and click Integrations at the top of the page.
-
Select an action group and choose On condition under Perform actions.
-
Set up one or more types of conditions:
- based on answers to form questions;
- based on test or quiz results;
- based on the domain where the user fills out the form;
-
Click Save.
To add multiple actions with different conditions, click Add group of actions at the bottom of the page and set up conditions and actions for the new group.
For more information about condition logic, see Adding questions to a form.
Based on answers to questions
-
Specify the question whose answer will be used as the action condition.
-
Select the comparison operator: equal or not equal.
-
Select or enter the answer to compare the user's response against.

-
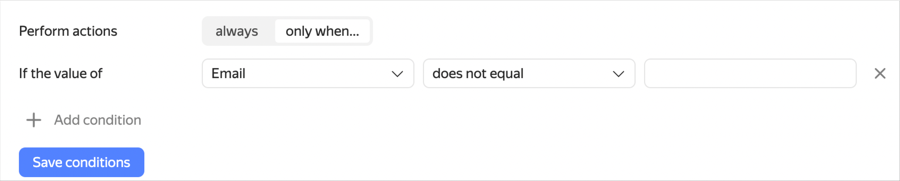
To trigger actions when the user provides any answer to the question, select not equal and leave the answer field empty.
-
To trigger actions when the user does not answer the question, select equal and leave the answer field empty.
For example, you can send an email to a user if they fill in the Email field in the form.
-
Based on test or quiz results
-
Set up score calculation. Conditions based on results are unavailable until score calculation is configured.
-
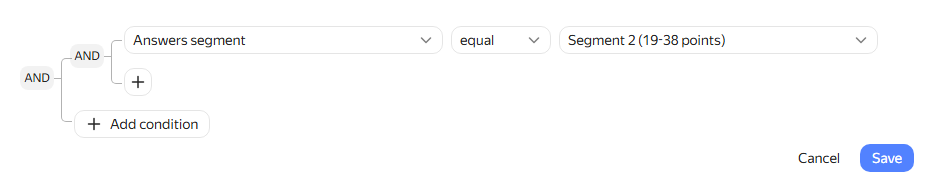
In the first condition field, select Answers segment.
-
Select equal or not equal, then specify the required segment.
The available values depend on the score calculation method. For Pass/Fail, you can select one of the two results. For Segments, you can select one of the configured score ranges.
For example, you can send a promo code by email only to participants who earned enough points to pass.
Based on domain
To trigger the action based on the domain where the user fills out the form, select tld in the first condition field.
Combining multiple conditions
-
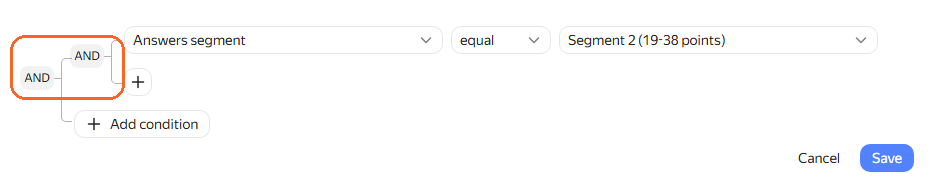
If you need to trigger the action when multiple conditions are met, click under the first condition. Set up the condition by selecting a question, a comparison operator, and an answer option.
The new condition will be grouped with the existing ones. By default, all conditions within the group are combined using the AND operator, so the action triggers only if all conditions are met simultaneously. If you want the action to trigger when at least one condition is met, click the operator icon to the left of the group to select the logical OR instead.
-
To set up more complex action-triggering logic, add multiple groups of conditions. Click Add condition under the list of conditions, configure the conditions in the new group, and select the logical operator to apply to them: AND or OR.
-
To delete a condition, hover over it and click to the right.