Connecting an existing or third-party mailbox
Connecting a mailbox on any email server
Use this method if you use an email service other than Yandex 360 or want to connect an existing mailbox on a Yandex 360 domain. For an existing Yandex 360 mailbox, use the IMAP and SMTP server settings from Yandex Mail Help. We recommend using the mailbox exclusively with Yandex Tracker: all incoming emails will be converted to issues in your queue.
Yandex Tracker doesn't support integration with the Microsoft Exchange Online messaging service.
Before you begin, open the queue settings and click Configure email addresses.
Select On any email server.
Setting up an email address for receiving messages
Messages sent to the email address specified for receiving messages are converted to queue issues. If the queue email address is associated with a user account, issues are automatically assigned to that user.
-
Under Email for receiving messages, in the Email field, specify the queue email address. For example:
login@yandex.com. The Login field will be populated automatically.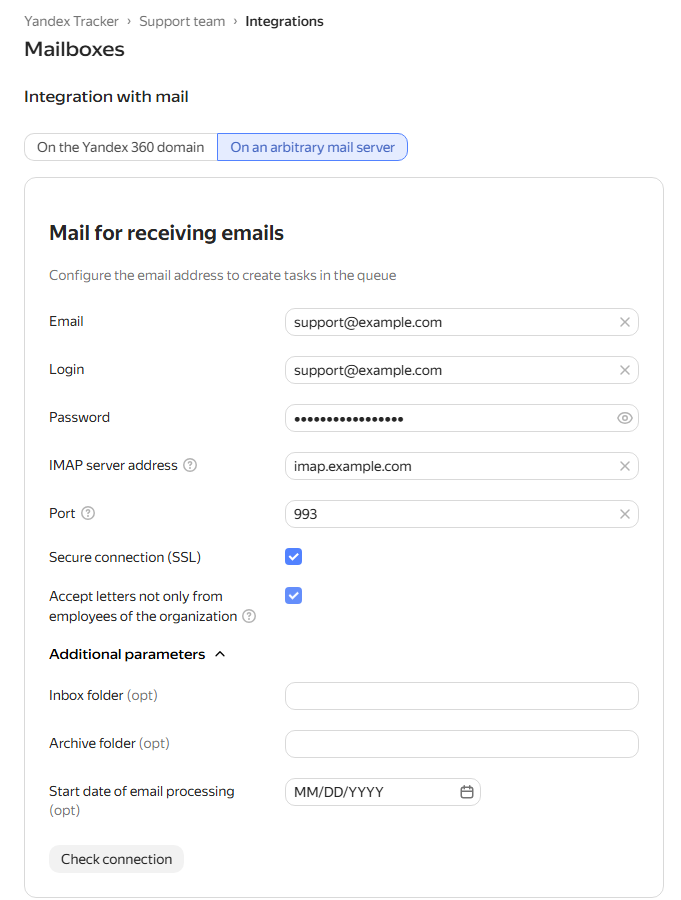
-
In the Password field, provide the password for the email account. If the chosen email server supports the use of application passwords to control access to the email account, provide the application password for email clients in this field. Learn more about application passwords in the Yandex ID documentation.
-
Enter the IMAP server address and the email server Port: they are required for collecting messages. You can find these details in the email account settings.
-
To enable SSL encryption, select Secure connection (SSL).
-
If you want to handle messages from both the organization's employees and external users, enable the Receive messages not only from company employees option.
Additional parameters
- Inbox folder: In your mailbox, create a folder for emails from Yandex Tracker and specify its name. Messages arriving in this folder are automatically converted to queue issues.
- Archive folder: In your mailbox, create a folder for archiving messages transferred to Yandex Tracker and specify its name. If the folder doesn't exist, Yandex Tracker attempts to create it automatically. If the email server doesn't allow the folder to be created, Yandex Tracker can't process messages.
- Start date of email processing: Specify the date. Messages received prior to this date are not processed and are automatically moved to the Archive folder. If no date is specified, issues will be generated from messages received from the date of setup.
Use separate folders to collect and archive incoming messages.
-
Click Check connection.
-
Specify the parameters to create issues from your email account with: the issue type and components.
-
Click Save. The email address will become active within one hour of creation.
Setting up an email address for sending messages
Replies to users from the issue page will be sent from the email address that you specified as an email address for sending messages. You can use the same email address that you specified as an email address for receiving messages.
-
Under Email for replying, click Add email address.
-
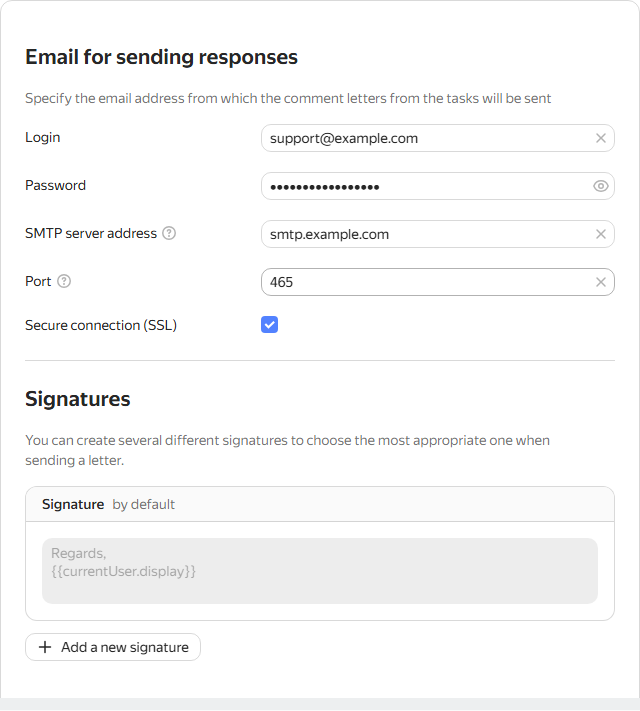
In the Login field, specify the email address for sending messages that you want to be converted to issue comments. For example:
login@yandex.com. You can use the same email address as you set up for creating issues in the queue or use a different email address for sending replies. -
In the Password field, provide the password for the email account. If the chosen email server supports the use of application passwords to control access to the email account, provide the application password for email clients in this field. Learn more about application passwords in the Yandex ID documentation.
-
Specify the SMTP server address and Port to enable sending messages. You can find these details in the email account settings.
-
To enable SSL encryption, select Secure connection (SSL).
-
To change the signature used in outgoing messages by default, click Add new signature. The email recipient will see the Alias field value as the sender name.
-
Test that everything is up and running: click Send a test email.