Configuring email integration
Setting up email integration in Yandex Tracker
-
In the left-hand panel, click Queues and select a queue.
-
In the top right corner of the queue page, click Queue settings.
A queue can be set up by its owner and Yandex Tracker administrators, as well as by users with the Queue settings permission.
-
Go to Integration → Email.
-
If you want to send emails to external email addresses from the issue page, select Allow sending emails outside. You can learn more here.
-
If you want the issue key to appear in the email subject, select Add the issue number to the subject of the email. Learn more.
Changing the queue email addresses
-
In the left-hand panel, click Queues and select a queue.
-
In the top right corner of the queue page, click Queue settings.
-
Go to Integration → Email.
-
Click Configure email addresses.
-
To add another email address to the queue, click Add email address.
You can link a maximum of 200 email addresses to queues in Yandex Tracker. If you need more, contact support.
Tracker processes large amounts of information every day, so emails from issue pages may be delayed by up to one hour.
-
To change the email account settings, click and select Edit.
-
To delete an email address, click and select Delete.
-
Editing an email signature
Signature templates are stored in the queue email settings. To edit a signature:
-
In the left-hand panel, click Queues and select a queue.
-
In the top right corner of the queue page, click Queue settings.
-
Go to Integration → Email.
-
Click Configure email addresses.
-
Click next to the email address and select Edit.
-
Under Email for replying, find the signature and click next to it. Alternatively, click Add new signature to create another template.
-
Edit the signature.
In the Signature field, use the editor tools to format text and add links. YFM markup is also supported, allowing you to insert images and use advanced formatting.
To insert the details of the employee replying to the email, click { } and select a variable:
- Full name: The employee's full name.
- Login: The employee's login.
- Email: The employee's email address.
- Phone: The employee's phone number.
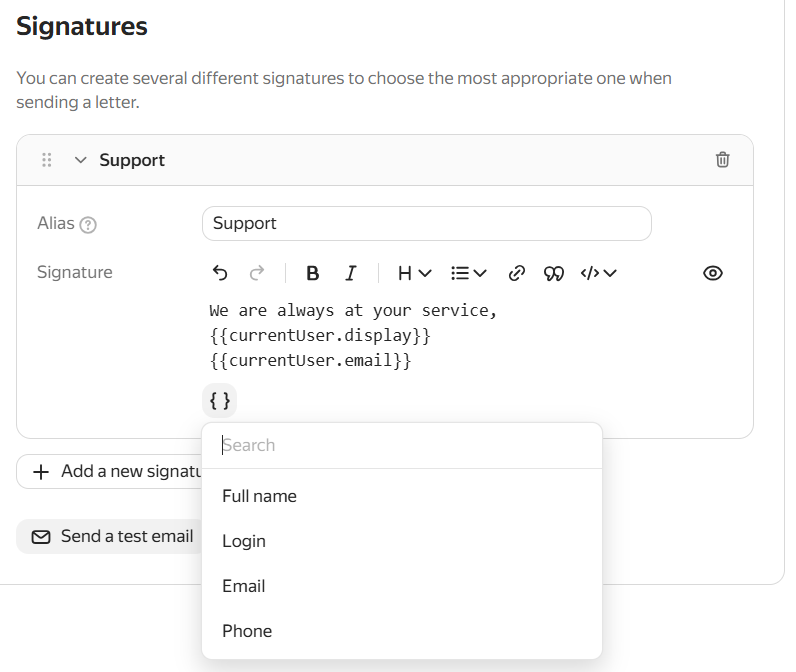
Variables let you create a single signature template for all queue members. When an email is sent, the details are automatically populated from the profile of the employee working on the issue.
-
Click Save.
Restricting access to issues
You can set up multiple email addresses for creating issues in a single queue. The queue can also contain other issues that the organization's employees created in the usual way.
To differentiate between various issues and manage access to them, use components. You can restrict access to issues where components are used. In this case, issues created from messages will only be accessible to specific employees:
-
Create components for different email addresses of the queue.
-
Specify the components when configuring a queue email under Issue parameters.
-
Set up user access to issues with components.
If an employee who is granted queue access permissions sends a message to the queue's email address, this employee becomes an issue's author with the respective permissions. If an issue is created by employees with no queue access permissions or external users, the Tracker robot is assigned as the issue's author.
Collecting requests from external users
Both your organization's employees and external users can send messages to the queue email. To convert messages from users who are not your staff members into issues, when setting up the queue email, select Receive messages not only from company employees.
Sending emails from the issue page
If you plan to communicate with external users from the issue page, select Allow sending emails outside and configure an email address for sending messages.
As a result, the Email tab appears in the Comments section on the issue page. You can send emails to the user who created the issue from it. Learn more about sending emails from the issue page.
Adding the issue number to the email subject
If you want the request number to be retained in a series of messages between you and the user, select Add the issue number to the subject of the email. As a result, when replying to the user from the issue page, its key will be added to the email subject.
You can edit the subject before sending your email if needed.