Examples of using triggers in Tracker
- Automatically assign an issue assignee
- Automatically invite an issue assignee
- Change issue status after creating a link
- Change issue status if a comment with specific text is added
- Automatically add issues to a board
- Automatically calculate the date difference
- Add the current date to a field
- Change issue priority when an SLA timer expires
- Change issue status after completing a checklist
- Close a parent issue after closing all subtasks
- Send a notification when an issue is created from an email
- Send a notification when an issue is created via a form
- Automatically add a form to issue comments
- Send notifications to messengers
- Create a subtask and write field values from the parent issue into it
- How to automatically assign an issue assignee based on status or component.
- How to automatically invite an issue assignee based on status and field value.
- How to automatically add issues to a board.
- How to automatically calculate the date difference in Tracker.
- How to add the current date to a field.
- How to change issue priority after an SLA timer is triggered.
- How to change issue status after posting a comment with specific text.
- How to change issue status after completing a checklist.
- How to automatically change issue status if a link of a specific type was added to it.
- How to close a parent issue after closing all sub-issues.
- How to automatically send a notification to a user after creating an issue from a support request via email.
- How to automatically send a notification to a user after creating an issue from a support request via Yandex Forms.
- How to automatically add a form to issue comments.
Automatically assign an issue assignee
Often, specific employees are responsible for different stages of work. When an employee completes their part of the work, they pass the task to the next assignee. If the team works in Tracker, each work stage corresponds to an issue status. When an issue transitions to a specific status, you can use a trigger to automatically assign the employee responsible for that work stage.
Another way to organize work is when designated employees are responsible for different areas. For example, each support employee handles requests for their own product. In this case, you can set up components in the queue that correspond to the company's products. When a specific component is added to an issue, you can use a trigger to automatically assign the employee responsible for working with that product.
Let's set up a trigger for automatically assigning an issue assignee:
-
On the queue settings page, go to Automation and click Create → Trigger in the top right corner. For more information, see How do I set up a trigger?.
-
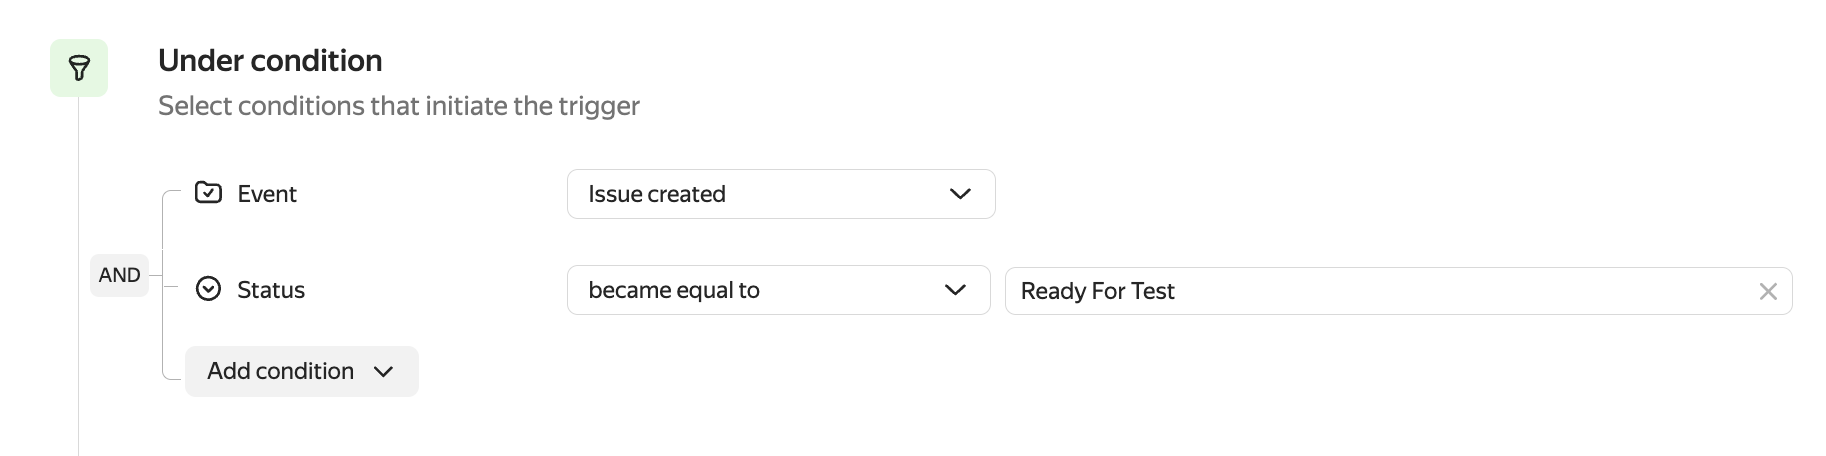
Set conditions so that the trigger fires when the Status or Components issue parameters change:
-
Add the condition Event → Issue changed.
-
To assign an issue assignee when the status changes, add the condition Status → became equal to and specify the status. Available statuses depend on the workflow configured for the queue.
To assign an issue assignee when components change, add the condition Components → became equal to and specify the components.
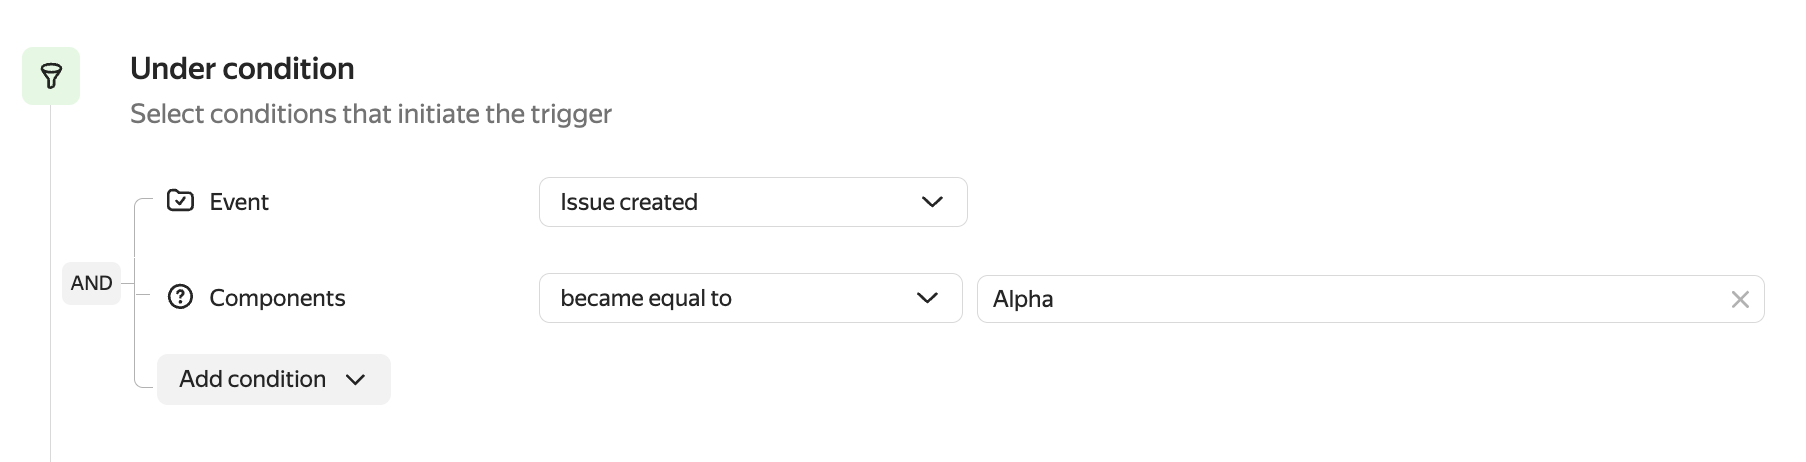
A trigger with this condition will only fire if a single component is specified in the issue.
-
Make sure the logical operator AND is specified to the left of the condition group so that the trigger fires when all conditions are met simultaneously.
-
-
Set the trigger action:
-
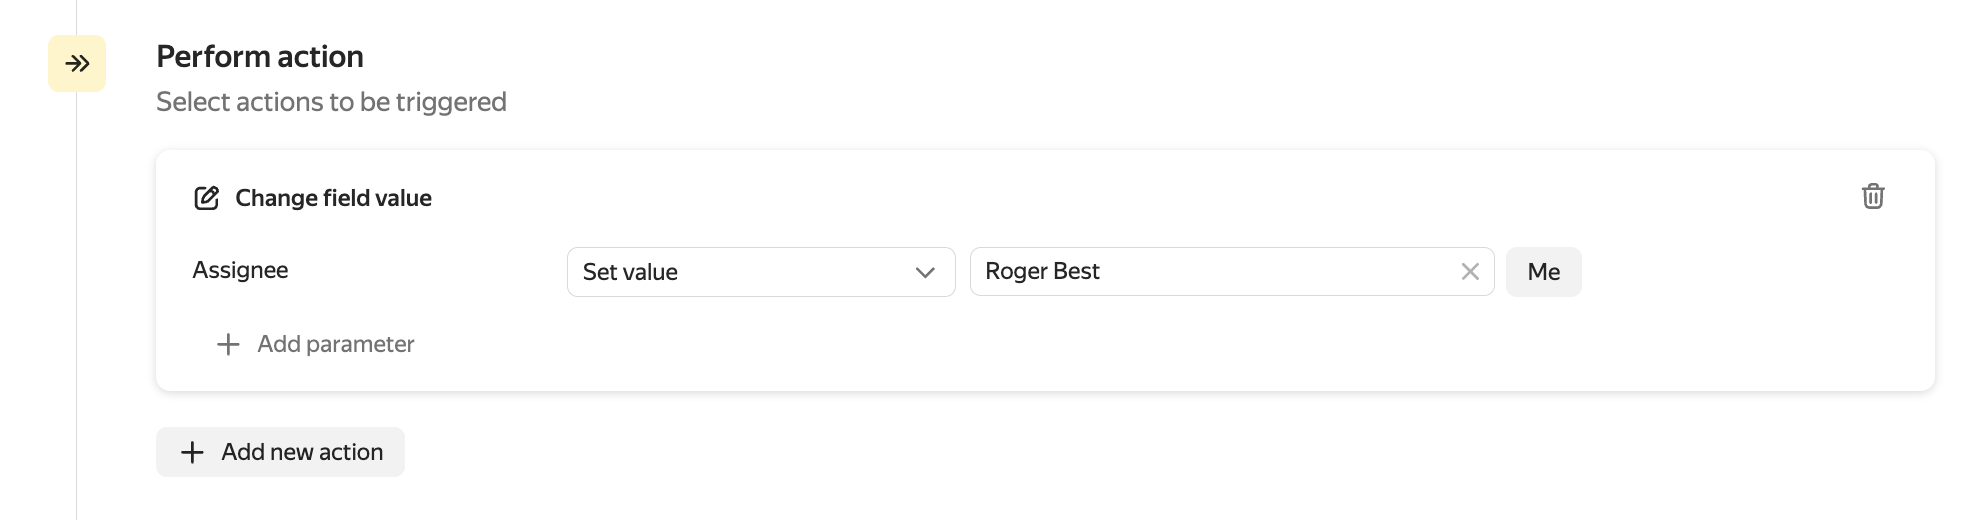
Add the action Change field value.
-
Add the parameter Assignee → Set value and specify the employee who should be assigned as the assignee when the trigger fires.
-
-
Save the trigger.
To test the trigger, change the status or components of any issue in the queue where you set up the trigger.
Automatically invite an issue assignee
After completing a task, an employee might forget to specify important information, such as time spent. In this case, you can set up a trigger that will automatically invite the assignee if the issue is closed and no time spent is specified:
-
On the queue settings page, go to Automation and click Create → Trigger in the top right corner. For more information, see How do I set up a trigger?.
-
Set conditions so that the trigger fires when an issue is closed if the Time spent field is empty:
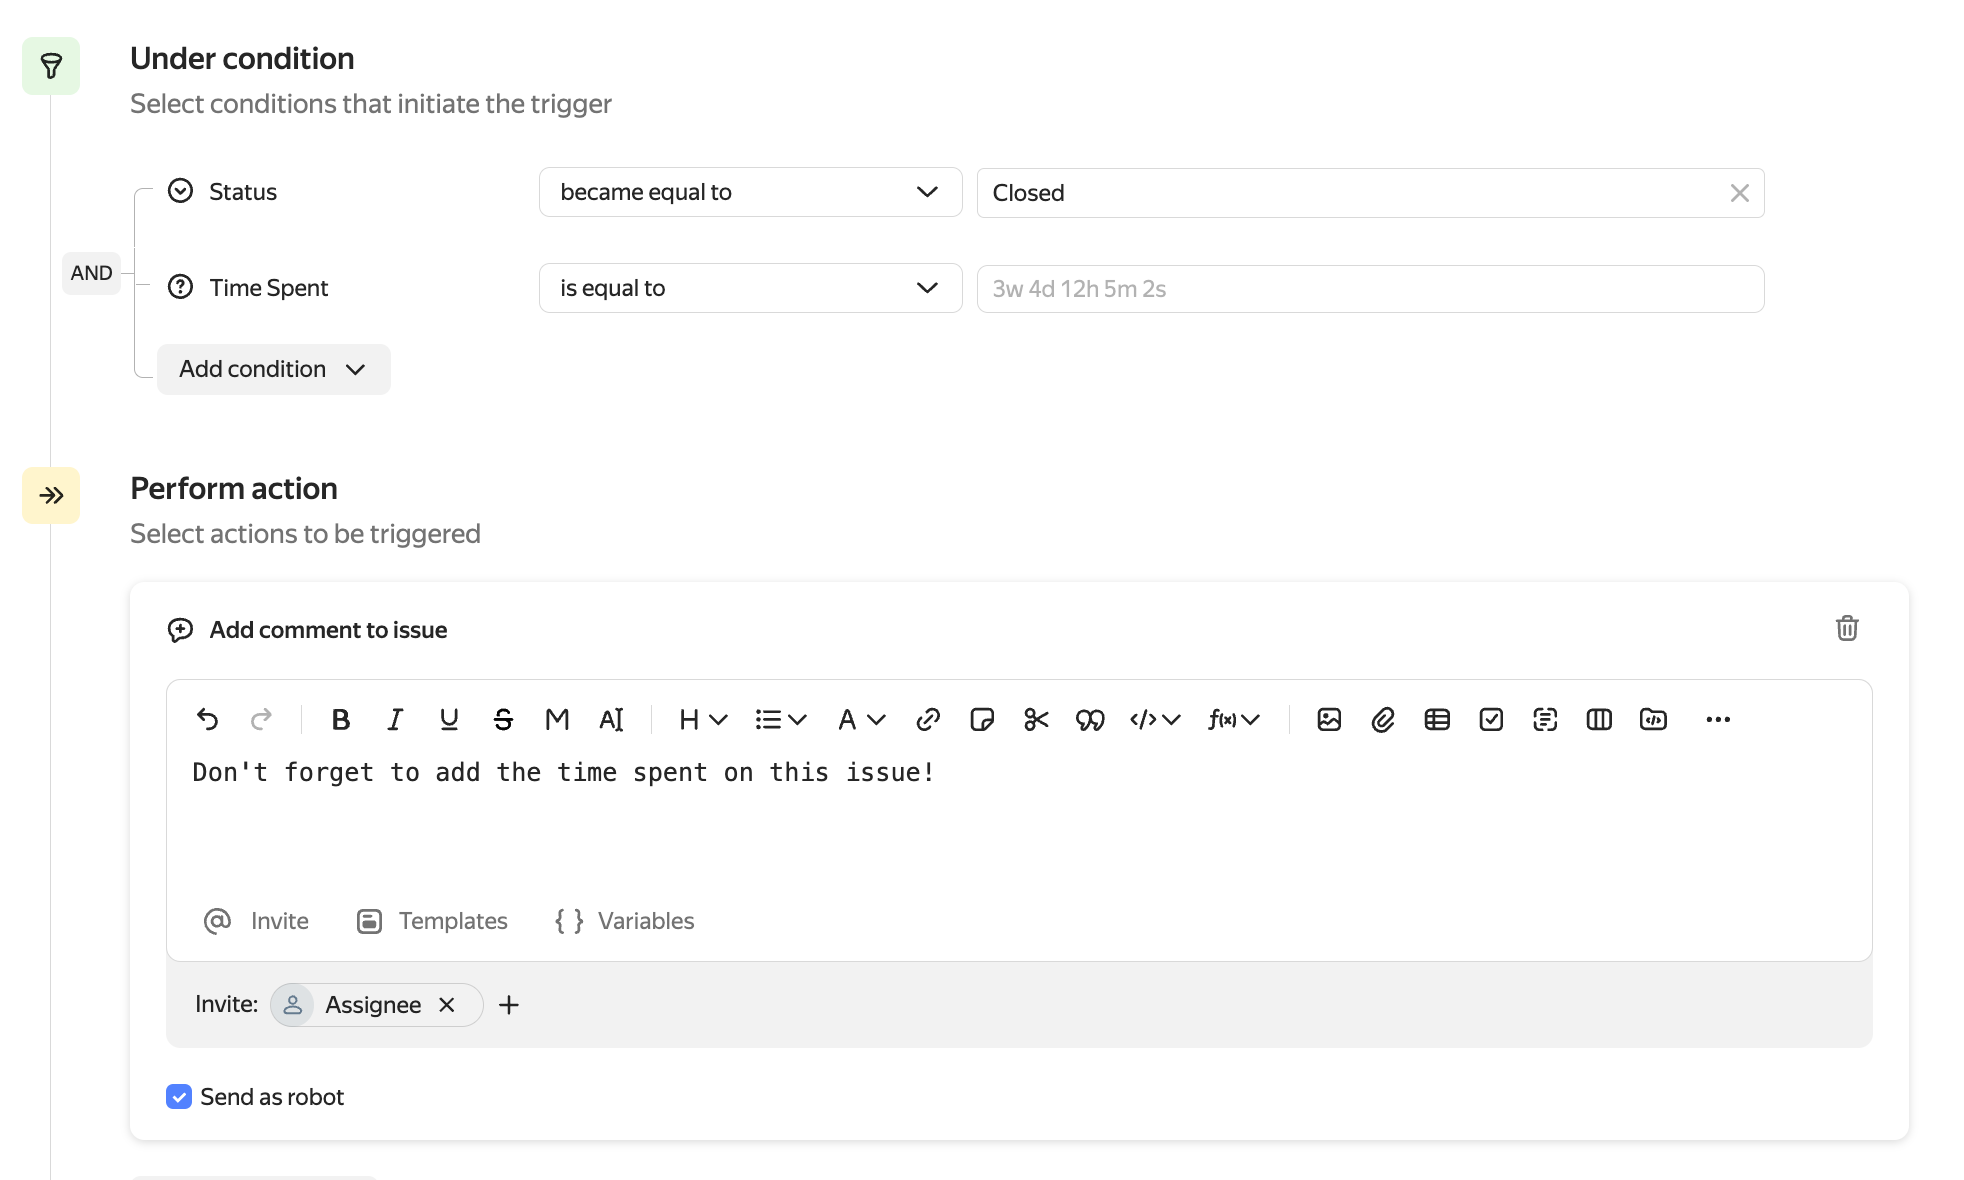
- Add the condition Status → became equal to → Closed. Available statuses depend on the workflow configured for the queue.
- Add the condition Time spent → Field value is empty.
- Make sure the logical operator AND is specified to the left of the condition group so that the trigger fires when all conditions are met simultaneously.
-
Set the trigger actions:
- Add the action Add comment to issue.
- Click Invite and select Assignee.
- Enter the comment text that the assignee should see and select the Send as robot option.
-
Click Create trigger.
When any issue is closed without time spent specified, the robot will create a comment and invite the assignee.
Change issue status after creating a link
In many projects, issues depend on each other, even when different people are working on them. If an issue affects the completion of one or more other issues, it's important to notify colleagues about the problems that have arisen. For example, link such issues together and set the link type Blocking issue.
Let's set up a trigger that will change the issue status and add a comment for the author if a Blocking issue link appears:
-
On the queue settings page, go to Automation and click Create → Trigger in the top right corner. For more information, see How do I set up a trigger?.
-
Set conditions so that the trigger fires when a Blocking issue link appears:
- Add the condition Link action → Link created → Blocking issue.

- Make sure the logical operator AND is specified to the left of the condition group so that the trigger fires when all conditions are met simultaneously.
-
Set the trigger actions:
-
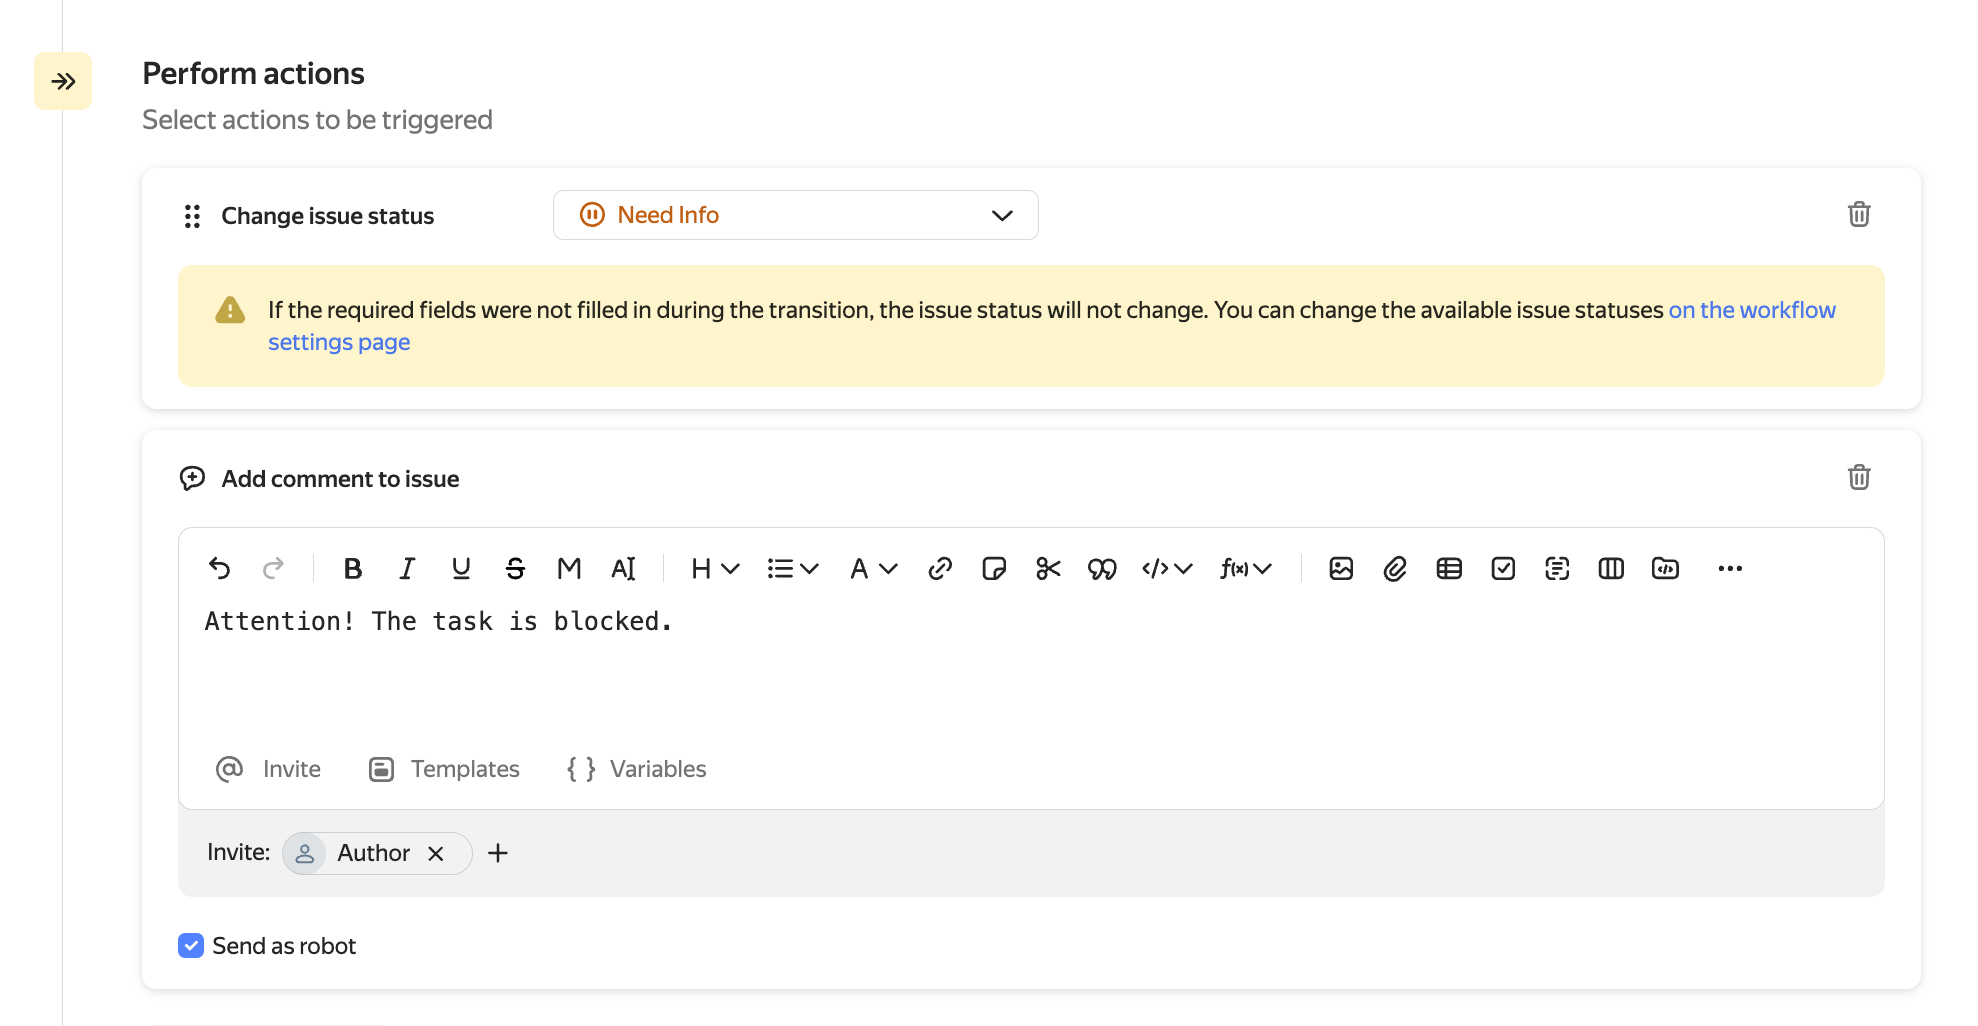
Add the action Change issue status.
-
In the Change issue status field, select the status that will be set for the issue after the condition is met. For example, Need info. Available statuses depend on the workflow configured for the queue.
Note that the trigger won't work if you need to fill out any fields on the transition screen to reach the selected status. For more information, see Transition settings.
-
Add the action Add comment to issue.
-
Click Invite and select Author.
-
Enter the comment text that the issue author should see and select the Send as robot option. Otherwise, the comment will be sent on behalf of the user who triggered the action — the one who added the link.
-
-
Click Create trigger.
Change issue status if a comment with specific text is added
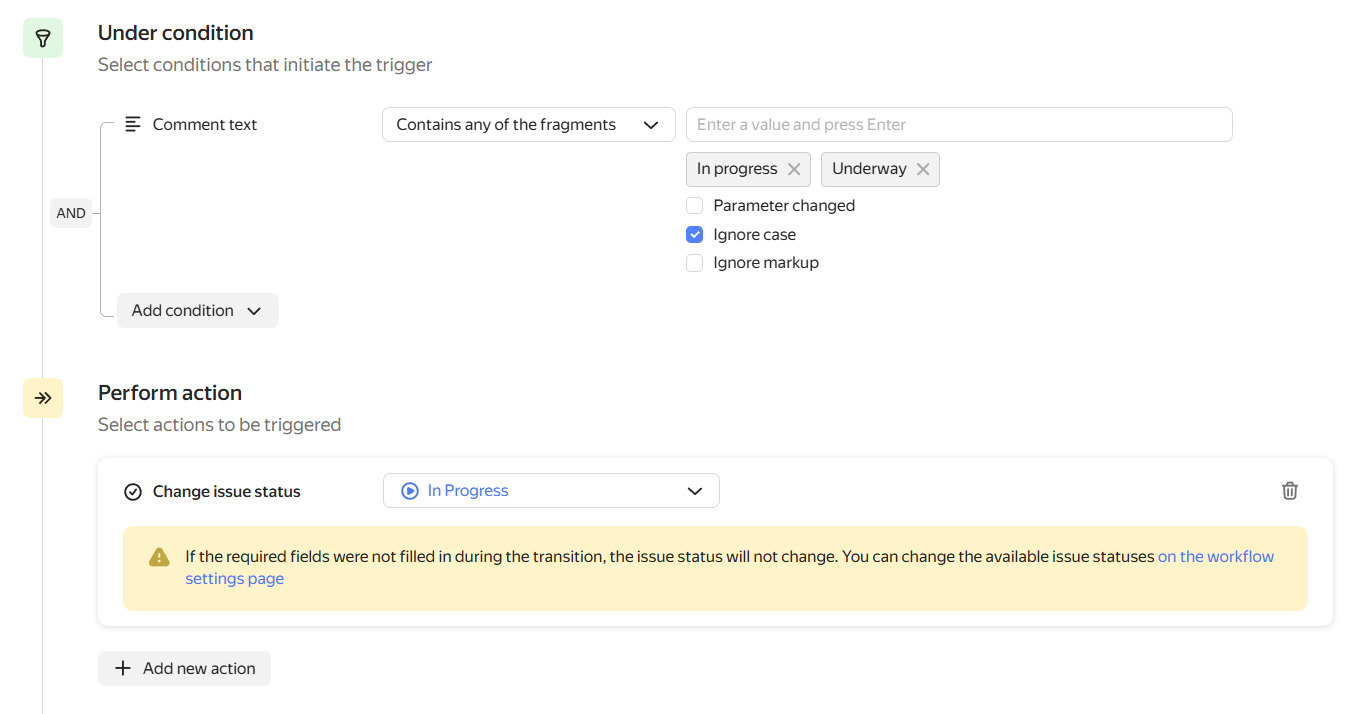
Let's set up a trigger that changes the issue status to In progress if a comment in the issue contains the fragments Взял в работу or Взяла в работу in any case:
-
On the queue settings page, go to Automation and click Create → Trigger in the top right corner. For more information, see How do I set up a trigger?.
-
Add the condition Comment text and select the comparison operation Contains any of the fragments.
-
Enter the text
Взял в работуand press Enter. Then enterВзяла в работуand press Enter. -
Enable the Ignore case option. Then the trigger will fire regardless of how the text fragment is written: with uppercase or lowercase letters.
-
Set the trigger action: in the list of actions, select Change issue status → In progress.
Note that the trigger won't work if you need to fill out any fields on the transition screen to reach the selected status. For more information, see Transition settings.
-
Click Create trigger.
Automatically add issues to a board
On the new version of the issue board, you can set up automatic addition of issues by filter or trigger.
Instead of a trigger, you can also set up an auto action with similar conditions and actions. When using an auto action, issues matching the condition will be added to the board not immediately, but at a set interval.
Triggers and auto actions only work for issues in the queue where they are configured.
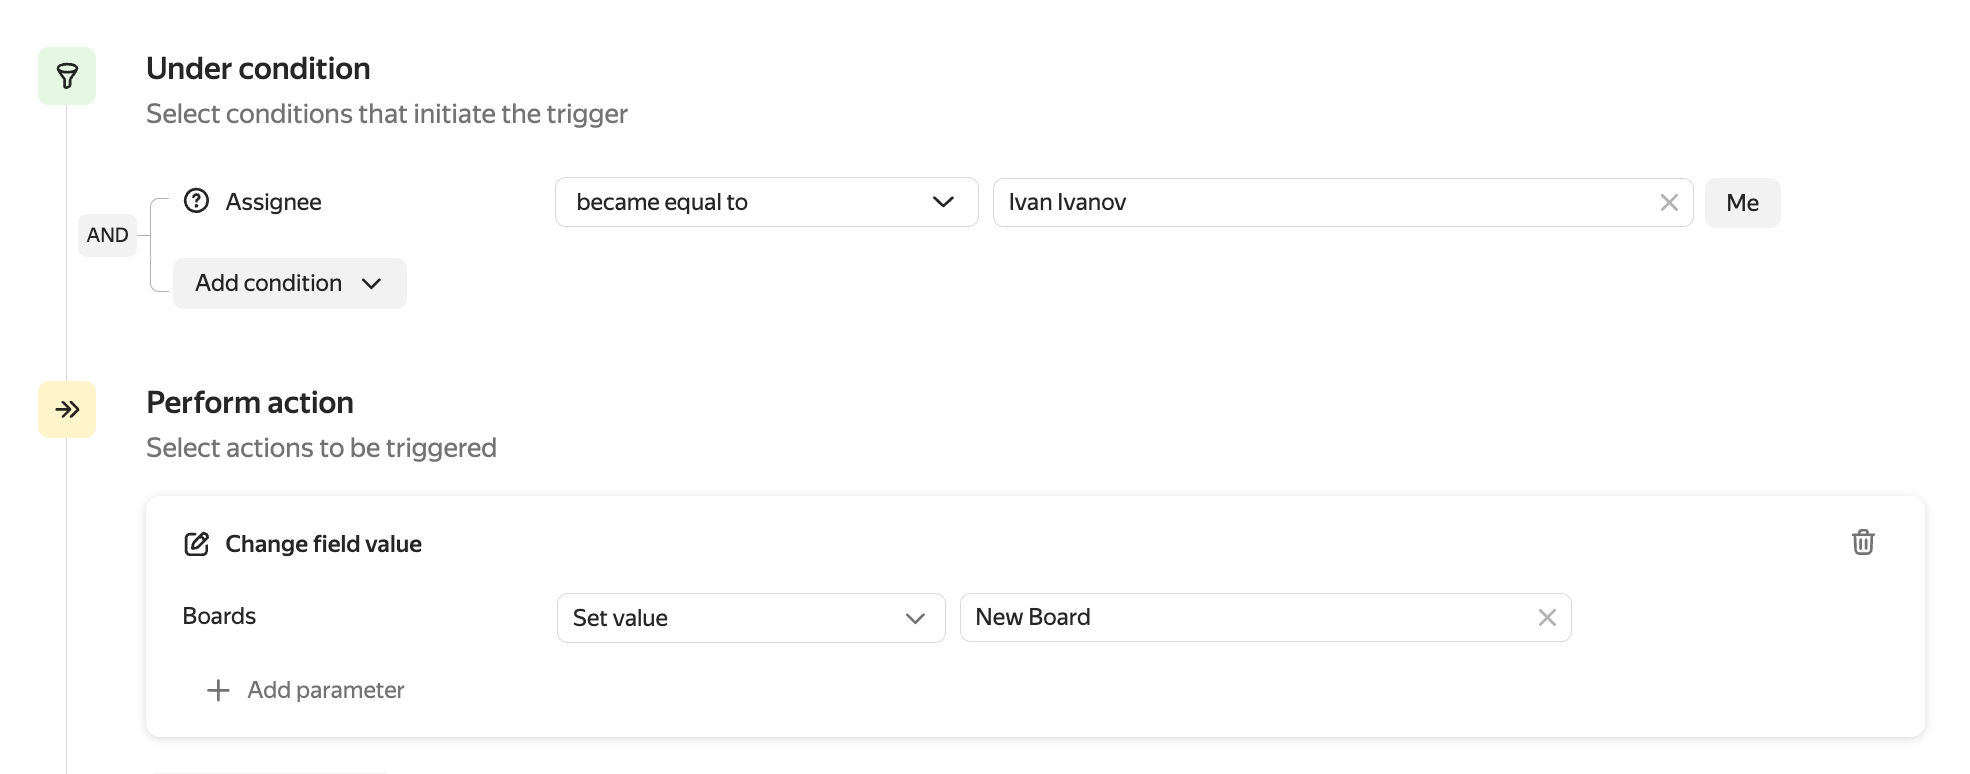
Let's consider an example of a trigger that adds an issue to a board when a specific user is assigned as the assignee:
-
On the queue settings page, go to Automation and click Create → Trigger in the top right corner. For more information, see How do I set up a trigger?.
-
Set the condition: Assignee → became equal to →
<username>.A trigger with this condition will also fire if a new issue is created with the specified assignee.
-
Set the action:
- Select the action Change field value.
- Select the Boards field.
- Select the action Add to list and specify the board to which the issue should be added.
-
Save the trigger.
Automatically calculate the date difference
Let's set up a trigger to automatically calculate the difference between dates in Tracker:
-
On the queue settings page, go to Automation and click Create → Trigger in the top right corner. For more information, see How do I set up a trigger?.
-
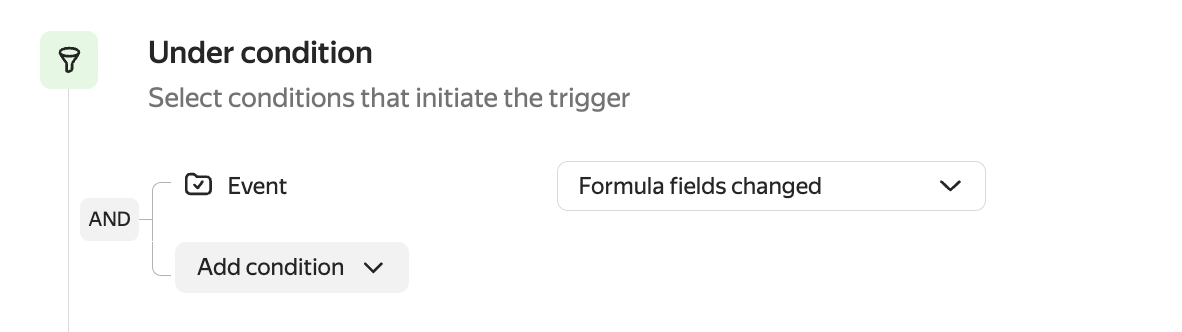
Add the condition Event → Formula fields changed.
-
Set the trigger actions:
-
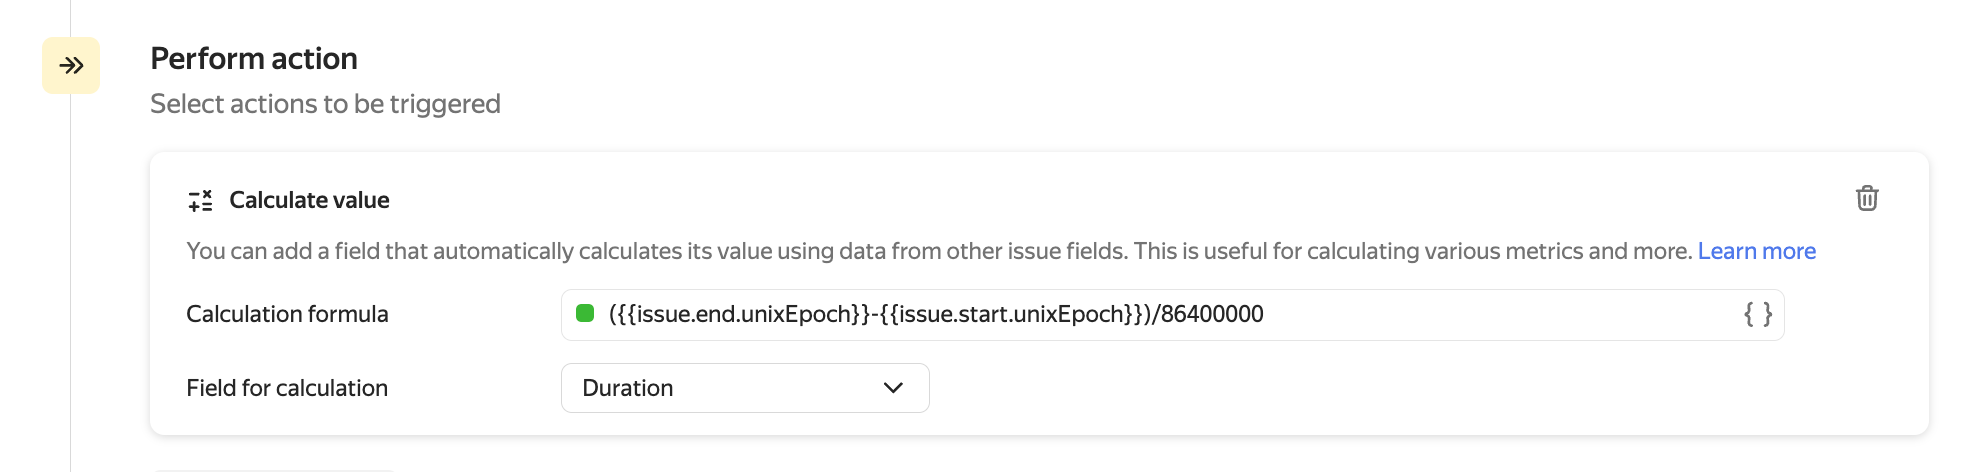
Add the value Calculate value.
-
To get the date difference value expressed in days, in the Formula for calculating value field, specify:
({{issue.end.unixEpoch}}-{{issue.start.unixEpoch}})/86400000 -
Select Calculated field from the list.
You can select a field from the standard ones or create a new one, for example, Duration:
-
-
Click Create trigger.
To test the trigger, change the values of the Start date and End date fields.
Add the current date to a field
Let's consider an example of a trigger that sets the current date in the Deadline field if the priority changes to critical:
-
On the queue settings page, go to Automation and click Create → Trigger in the top right corner. For more information, see How do I set up a trigger?.
-
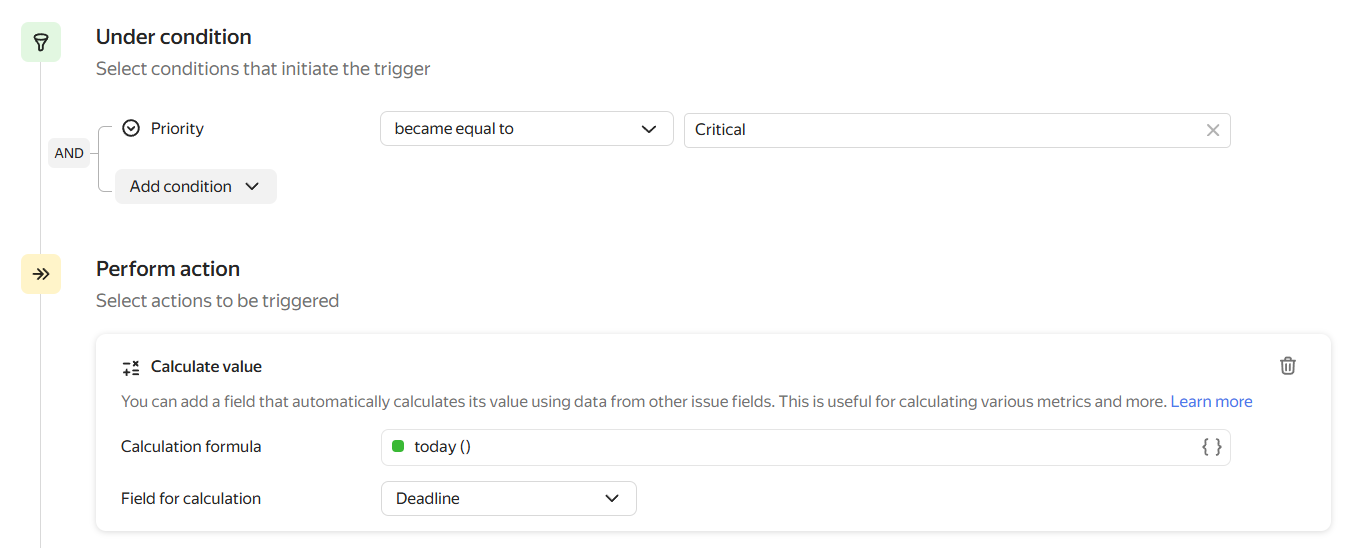
For the trigger to fire when the issue priority changes, set the condition Priority → became equal to → Critical.
-
Set the trigger action:
-
Add the action Calculate value.
-
In the Formula for calculation field, specify
today(). -
In the Calculated field field, select Deadline.
-
-
Save the trigger.
To test the trigger, change the priority to critical for any issue in the queue where you set up the trigger.
Change issue priority when an SLA timer expires
If you have configured SLA rules for a queue, you can create a trigger that fires when a timer is exceeded.
Let's look at an example trigger that changes an issue's priority to "Critical" if the SLA timer is exceeded.
-
On the queue settings page, go to Automation and click Create → Trigger in the top right corner. For more information, see How do I set up a trigger?.
-
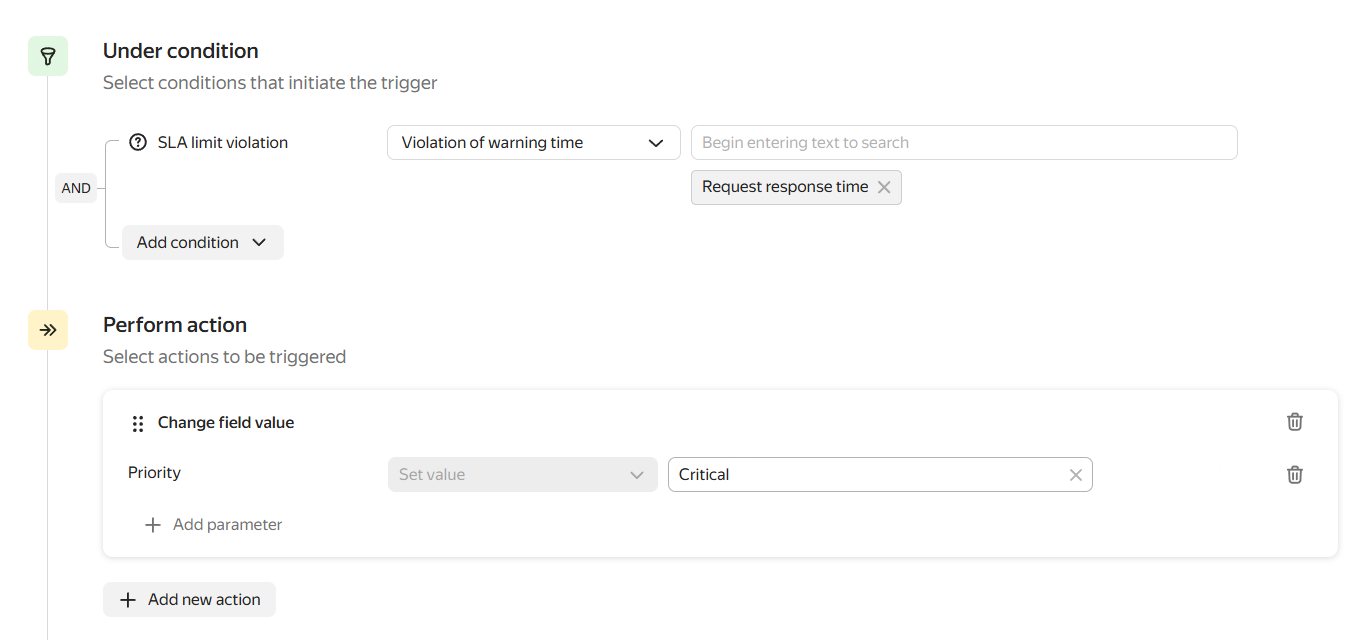
Add the SLA limit violation condition.
-
Select a timer:
- Warning time — when this time expires, Tracker sends a warning that the issue processing time is running out. This is an optional SLA parameter.
- Time to resolve — the maximum time for processing an issue.
-
Enter the name of the rule you configured for the queue. For example, "Response time for request".
-
Set the trigger action:
- In the actions list, select Change field value.
- Add the Priority parameter and set the value to Critical.
-
Click Create trigger.
Change issue status after completing a checklist
Let's look at an example trigger that moves an issue to the "Resolved" status if all checklist items in the issue are completed:
-
On the queue settings page, go to Automation and click Create → Trigger in the top right corner. For more information, see How do I set up a trigger?.
-
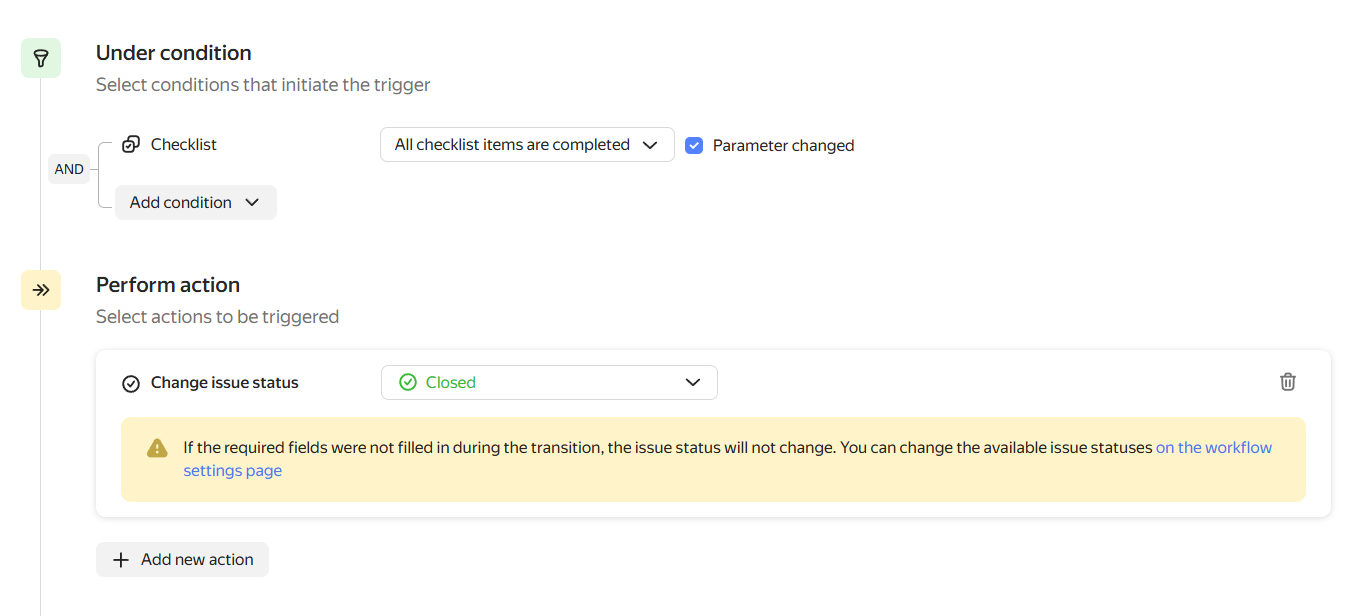
Add the condition: Checklist → All checklist items are completed.
-
Next to the condition, enable the Parameter changed option. This ensures the trigger only fires when the last checklist item is marked as completed. The trigger won't fire when the issue is changed if all checklist items were completed earlier.
-
Set the trigger action: in the actions list, select Change issue status → Resolved.
Note that the trigger won't work if you need to fill out any fields on the transition screen to reach the selected status. For more information, see Transition settings.
-
Click Create trigger.
Close a parent issue after closing all subtasks
Let's look at an example trigger that moves a parent issue to the "Closed" status if all subtasks are closed.
For the trigger to fire, the author of the subtask changes must have at least read permissions for the parent issue.
-
On the queue settings page, go to Automation and click Create → Trigger in the top right corner. For more information, see How do I set up a trigger?.
-
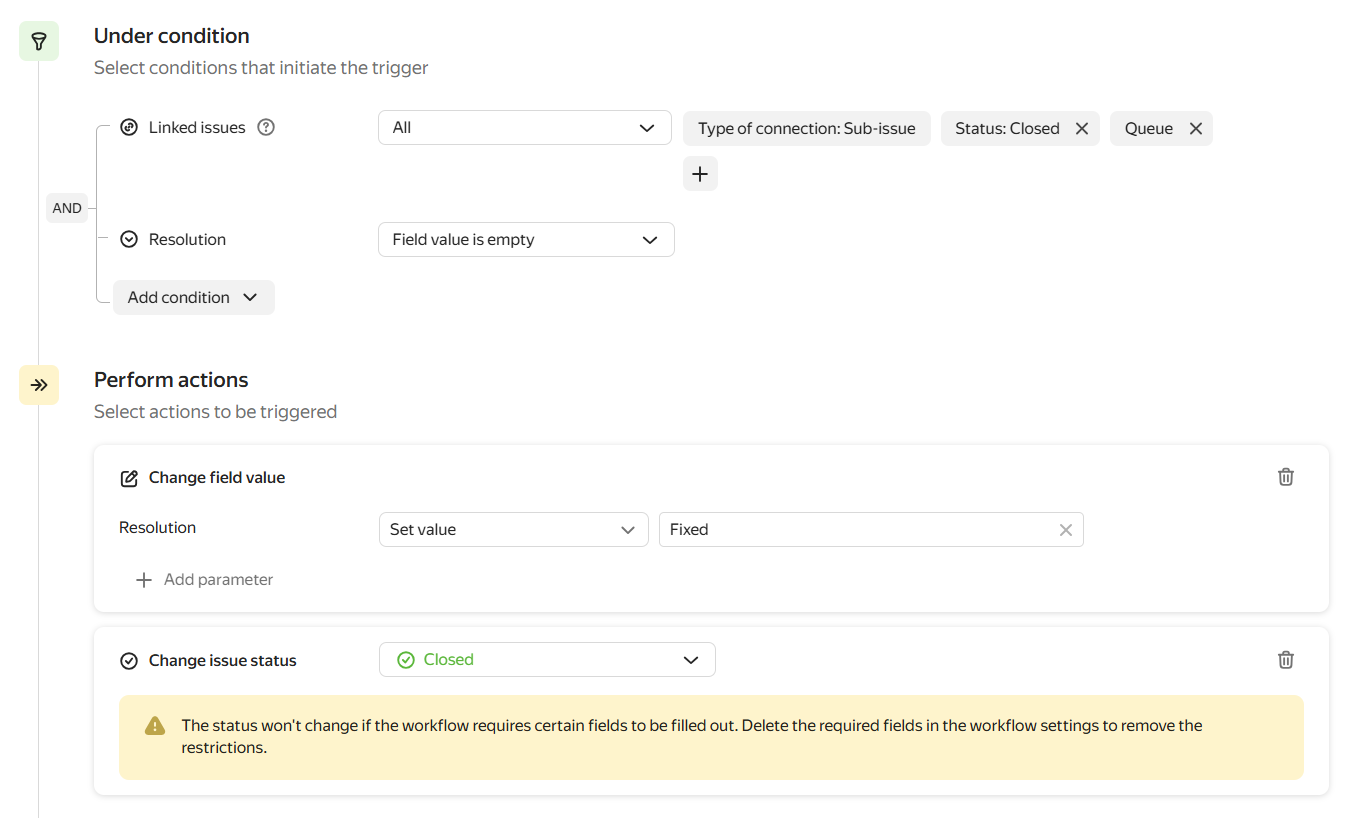
Set conditions so the trigger fires when all subtasks are closed:
- Add the condition: If → Related issue parameters.
- Select the firing condition: Related issues → All.
- Add issue filter parameters: specify the link type Subtask and the status Closed.
- Add the condition: Resolution → Field value is empty, to avoid the trigger firing again when the subtask is modified.
- Make sure the logical operator AND is specified to the left of the condition group, so the trigger fires only when all conditions are met simultaneously.
It's not recommended to use the Related issue parameters and Event conditions simultaneously, as the trigger might not fire.
-
Set the trigger actions to change the parent issue status and send a comment:
-
In the actions list, select Change field value. Then add the Resolution parameter → Set value → Resolved.
-
In the actions list, select Change issue status → Closed.
Note that the trigger won't work if you need to fill out any fields on the transition screen to reach the selected status. For more information, see Transition settings.
-
-
Click Create trigger.
The trigger condition is checked asynchronously, so the parent issue status might be updated within a few minutes.
Send a notification when an issue is created from an email
Let's assume that support staff register requests in Tracker. Users write to support via email, and issues are created in Tracker based on their emails.
Let's set up a trigger that will send the user an email notification that their request has been registered after the issue is created:
Step 1. Configure email integration
To send emails from Tracker and create issues from incoming emails, set up email integration:
-
On the queue settings page, go to Automation and click Create → Trigger in the top right corner. For more information, see How do I set up a trigger?.
-
Configure a mail address for the queue where issues for user requests will be created.
If adding a queue address is unavailable, it means your organization doesn't have a domain. A domain is needed to create mailboxes and mailing lists, including creating a queue address. You can connect a domain for free in the Yandex 360 for Business service.
-
Configure aliases and signatures, if needed.
-
If the users are not employees of the organization:
Step 2. Set up a trigger to send emails
Set up a trigger that will send the user an email notification when a new issue is created from an incoming email:
-
On the queue settings page, go to Automation and click Create → Trigger in the top right corner. For more information, see How do I set up a trigger?.
-
Set conditions so the trigger fires when a new issue is created from an incoming email:
-
Add the condition Event → Issue created.
-
Add the condition Email → Created by email to address → Equals string and enter the queue's mail address.
-
Enable the Ignore case option in case the user enters the queue address with a capital letter.
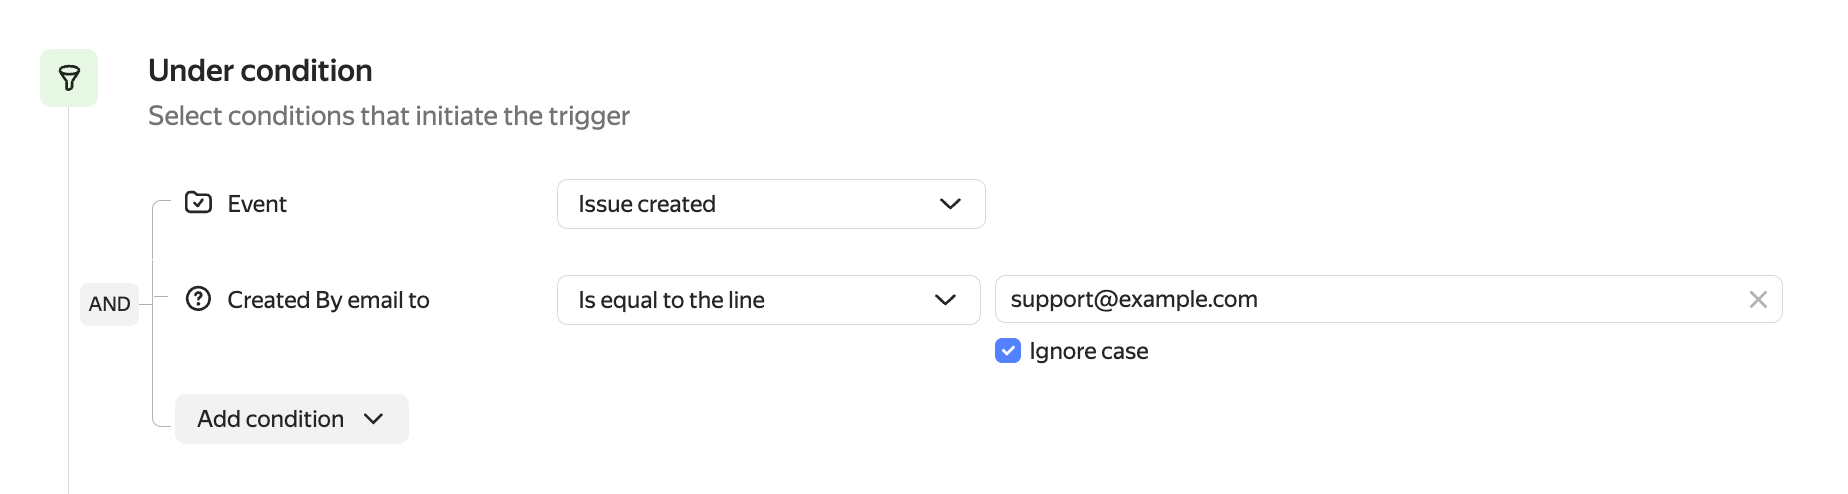
- Make sure the logical operator AND is specified to the left of the condition group, so the trigger fires only when all conditions are met simultaneously.
-
-
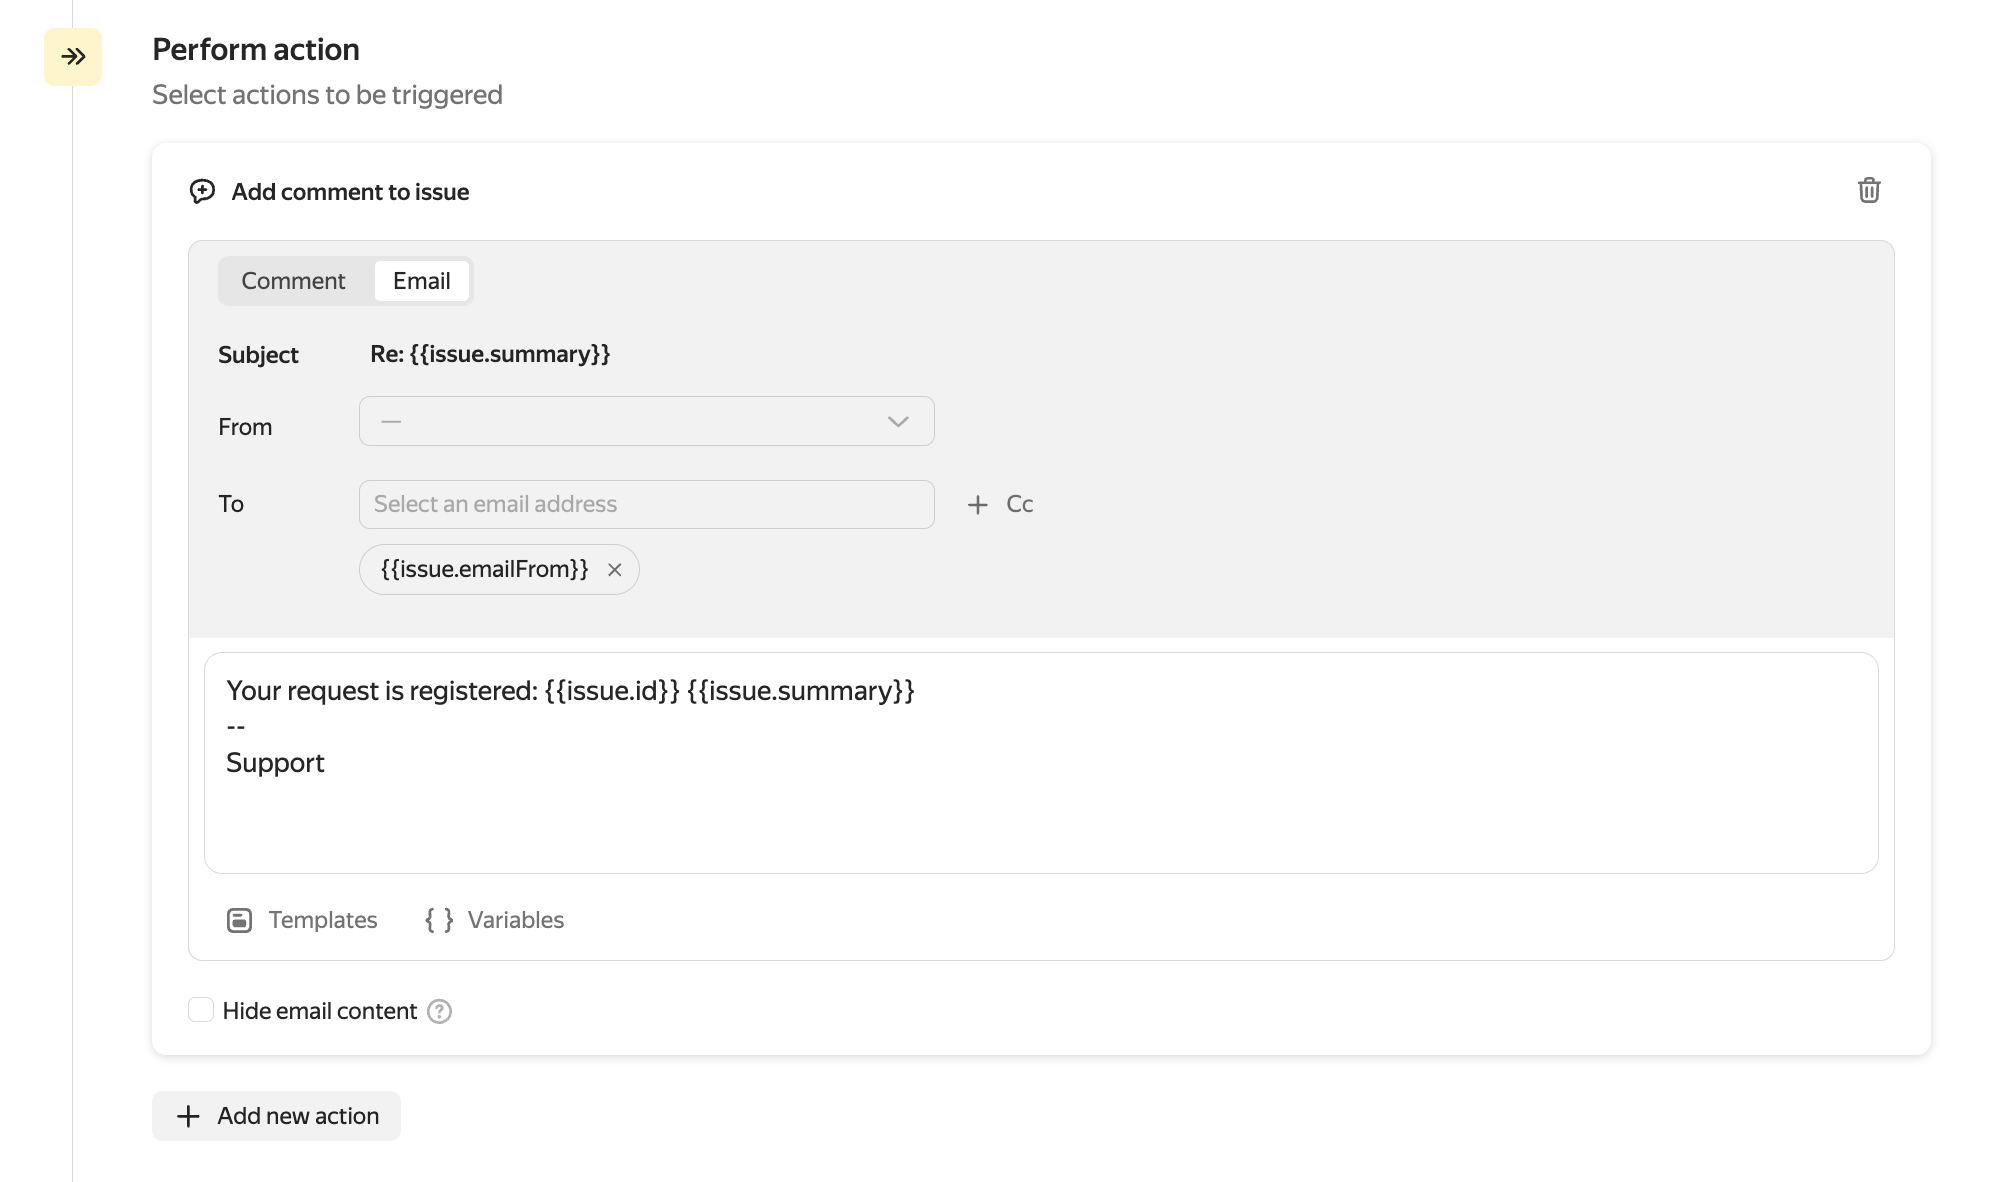
Set the trigger action to send an email:
- Select the action Add comment to issue.
- Enable the Email option.
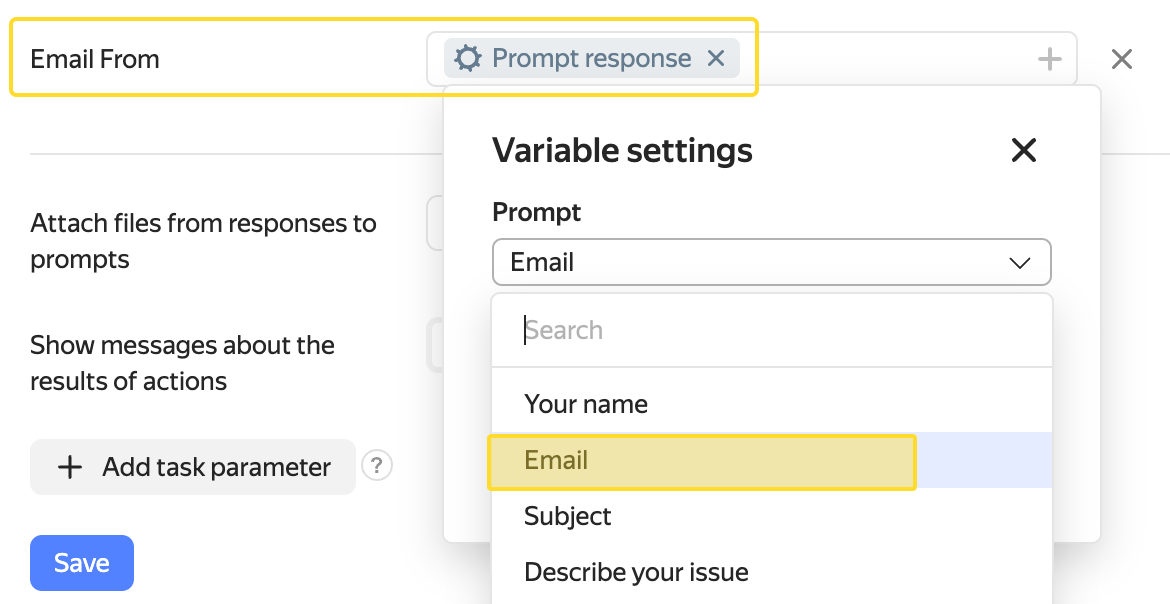
- In the To field, add the variable with the address of the user who sent the request. To do this, select the To field, click Variables, and select Email → From.
- Write the email text. You can add issue parameters to the email using the Variables button.
-
Save the trigger.
To test the trigger, send an email to the queue's mail address.
Send a notification when an issue is created via a form
Let's assume that support staff register requests in Tracker. Users contact support via a feedback form created in the Yandex Forms service. Issues are created in Tracker based on the completed form.
Let's set up a trigger that will send the user an email notification that their request has been registered after the issue is created:
Step 1. Configure email integration
To send emails from Tracker, set up email integration:
-
Configure a mail address for the queue where issues for user requests will be created.
If adding a queue address is unavailable, it means your organization doesn't have a domain. A domain is needed to create mailboxes and mailing lists, including creating a queue address. You can connect a domain for free in the Yandex 360 for Business service.
-
Configure aliases and signatures, if needed.
-
If the users are not employees of the organization, allow sending emails from issues to external addresses.
Step 2. Set up a form for registering requests
To create issues from requests via a form:
-
Go to the Yandex Forms service and create a new form.
-
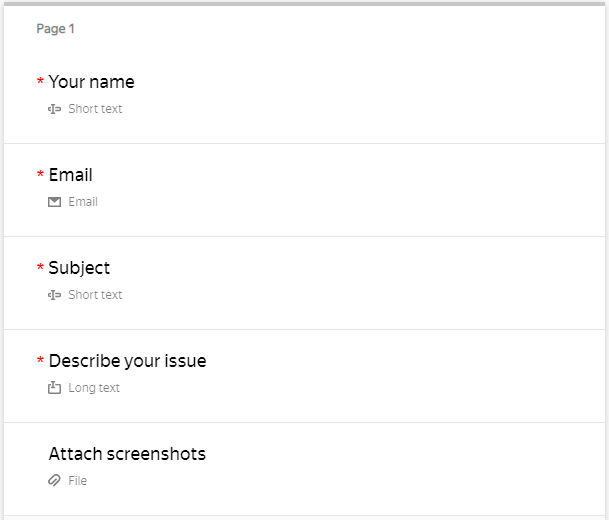
Add questions to the form so the user can provide the information needed to register the request.
To find out the user's email address, add a Email question and make it required.
-
Configure integration with Tracker for the form:
-
Specify the queue and other issue parameters.
-
In the Issue description field, add the answers to the form questions.
-
To save the user's email address in the issue parameters, add the From field and select Variables → Answer to question → Email.
-
Save the integration parameters.
-
-
Publish the form.
Step 3. Set up a trigger to send emails
Set up a trigger that will send the user an email notification when a new issue is created via the form:
-
On the queue settings page, go to Automation and click Create → Trigger in the top right corner. For more information, see How do I set up a trigger?.
-
Set conditions so the trigger fires when a new issue is created from an incoming email:
-
Add the condition Event → Issue created.
-
Add the condition Email → From → Field value is set.
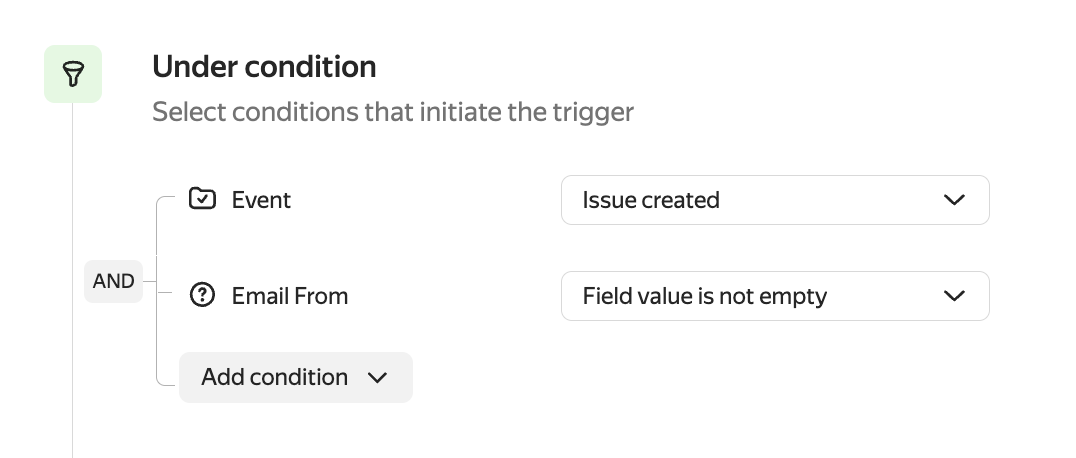
- Make sure the logical operator AND is specified to the left of the condition group, so the trigger fires only when all conditions are met simultaneously.
-
-
Set the trigger action to send an email:
-
Select the action Add comment.
-
Enable the Email option.
-
In the To field, add the variable with the address of the user who sent the request. To do this, select the To field, click Add variable, and select Email → From.
-
Write the email text. You can add issue parameters to the email using the Add variable button.
-
-
Save the trigger.
To test the trigger, fill out the form for which you configured integration with Tracker.
Automatically add a form to issue comments
You can use a trigger to add a form with pre-filled fields to an issue comment. To do this, add a special code with a link to the form in the comment text. You can pass values to the form fields via GET parameters. For example, you can pass issue parameters using variables available in the trigger.
Let's set up a trigger that will add a feedback form to comments and invite the assignee after the issue is closed:
Step 1. Create a feedback form
-
Go to Yandex Forms and create a form.
-
Add questions to the form so the assignee can provide the necessary information.
Step 2. Create a trigger to add the form
-
On the queue settings page, go to Automation and click Create → Trigger in the top right corner. For more information, see How do I set up a trigger?.
-
Set the conditions for the trigger to fire when the issue is closed: add the condition Status → became equal to → Closed.

-
Add the Add comment to issue action.
-
Insert the following code into the comment text:
/iframe/(src="https://forms.yandex.com/cloud/surveys/<form_ID>/?iframe=1&<question_ID>=<value>" frameborder=0 width=500)Where:
-
<form_ID>is the ID of the form to be added; -
<question_ID>is the question ID; -
<value>is the value to be inserted into the form field.To pass issue parameters to the form, use variables as values: at the bottom of the window, click Variables and select an issue parameter.
For example, to pass the [issue key](*issuekey), use the value
{{issue.key}}. To pass the issue assignee's login, use the value{{issue.assignee.login}}.
Example code that passes the issue key to a form field:
/iframe/(src="https://forms.yandex.com/cloud/surveys/68***/?iframe=1&answer_short_text_584943={{issue.key}}" frameborder=0 width=100% height=660px scrolling=no) -
-
Click Invite and select Assignee.
-
Enable the Send on behalf of robot option.
-
Click Create trigger.
Step 3. Add yndx-forms-cnt-robot@ to the queue
To insert the form correctly, grant the yndx-forms-cnt-robot@ robot access to the queue. For more information about setting up access, see Configure queue access.

After the issue is closed, the robot will create a comment with the form and invite the assignee.
Send notifications to messengers
Using messengers is convenient for quickly notifying employees about important events. If a messenger has an API, you can set up a trigger in Tracker that sends HTTP requests to the messenger's API when certain events occur. For example, when an error with a critical priority is created in a queue.
Examples of setting up triggers for sending notifications are provided in Integration with messengers.
Create a subtask and write field values from the parent issue into it
Let's look at an example of a trigger that creates a subtask and populates its fields with values from the original issue. Using a trigger and the Yandex Tracker API, you can configure automatic creation of such a task:
-
On the queue settings page, go to Automation and click Create → Trigger in the top right corner. For more information, see How do I set up a trigger?.
-
Select the trigger conditions.
-
As the target action, select HTTP request.
-
Specify the request parameters. In the Request body field, specify the parameters of the subtask to be created. To insert values from the original issue, use variables.
Example request parameters
Field
Content
Method
POST
Address
https://api.tracker.yandex.net/v3/issuesAuthentication method
OAuth 2.0
Token
Authorization header
Authorization
Token type
OAuth
Content type
application/json
Request body
Example: create a subtask and pass fields from the original issue into it: description, assignee, followers, and tags.
{
   "summary": "My issue",
   "queue": "TEST",
   "description": {{issue.description.json}},
   "links": [
       {
           "relationship": "is subtask for",
           "issue": "{{issue.key}}"
       }
   ],
   "assignee": "{{issue.assignee.login}}",
   "tags": {{issue.tags.json}},
   "followers": {{issue.followers.uid.json}}
}
More about the request: Create issue, Link issues.
Headers
Header:
X-Org-IDorX-Cloud-Org-IDValue: Organization ID.
To get the organization ID, go to Administration → Organizations and copy the value from the ID field.
The parameters you pass in the request body using variables must be filled in the original issue. Otherwise, the trigger won't fire.
-
Click Create trigger.
## Update status, priority, and add a comment in related issues {#update-related-tasks}

Let's look at an example of a trigger that updates the status, priority, and adds a comment in related issues. Using a trigger and the [Yandex Tracker API](../{% if distr == 'on-prem' %}api/about-api.html{% else %}api-ref/about-api.md{% endif %}), you can configure automatic updates for related issues:

1. {% include [create-trigger](../_includes/create-trigger.md#all-in-one) %}

1. Select the [trigger conditions](../user/set-condition.md).

   {% note warning "" %}

   When setting up trigger conditions, pay attention to the possibility of a cascade call in related issues.

   {% endnote %}

1. For the target action, select [**HTTP request**](../user/set-action.md#create-http).

1. Specify the request parameters. In the **Request body** field, specify the update parameters for the related issues. To insert values from the source issue, use [variables](../user/vars.md).

    {% cut "Example request parameters" %}

     #|
    || **Field** | **Content** ||
    || Method | POST ||
    || Address | `https://api.tracker.yandex.net/v3/bulkchange/_transition` ||
    || Authentication method | OAuth 2.0 ||
    || Token | [Guide to obtaining a token](../{% if distr == 'on-prem' %}api/access.html{% else %}api-ref/access.md{% endif %}#about_oauth) ||
    || Authorization header | Authorization ||
    || Token type | OAuth ||
    || Content type | application/json ||
    || Request body |

    >Example: update the status, priority, and add a comment in related issues.
    >
    >```json translate=no
    >{
    >    "transition": "need_info",
    >    "issues": "Relates: {{issue.key}}",
    >    "values": {
    >        "comment": "Comment text",
    >        "priority": {
    >            "key": "critical"
    >        }
    >    }
    >}
    >```
    Learn more about the request: [Bulk change issue status](https://yandex.com/support/tracker/api-ref/bulkchange/bulk-transition.html). ||
    {% if audience == "external" %}|| Headers | Header: `X-Org-ID`{% if distr == 'saas' %} or `X-Cloud-Org-ID`{% endif %}

    Value: Organization ID.

    {% include notitle [org-id](../_includes/api/org-id.md#find-id) %}

    ||{% endif %}
    |#

    {% endcut %}

    {% note info "" %}

    If you only need to change field values in related issues without changing the status, use this request: [Bulk edit issues](https://yandex.com/support/tracker/api-ref/bulkchange/bulk-update-issues.html).

    The parameters you pass in the request body using variables must be filled in the source issue. Otherwise, the trigger won't fire.

    {% endnote %}

1. Click **Create trigger**.

## Create a subtask with the text of the user's last comment {#create-ticket-with-user-last-comment}

Let's look at an example of a trigger that automatically creates a subtask with the text of the user's last comment. Using a trigger and the [Yandex Tracker API](../{% if distr == 'on-prem' %}api/about-api.html{% else %}api-ref/about-api.md{% endif %}), you can configure automatic creation of such an issue:

1. {% include [create-trigger](../_includes/create-trigger.md#all-in-one) %}

1. Under **Trigger conditions**, select **Last comment → Field value changed**.

1. For the target action, select [**HTTP request**](../user/set-action.md#create-http).

1. Specify the request parameters. In the **Request body** field, specify the parameters for the subtask to be created. To insert values from the source issue, use [variables](../user/vars.md#comment-variables).

    {% cut "Example request parameters" %}

    #|
    || **Field** | **Content** ||
    || Method | POST ||
    || Address | `https://api.tracker.yandex.net/v3/issues` ||
    || Authentication method | OAuth 2.0 ||
    || Token | [Guide to obtaining a token](../{% if distr == 'on-prem' %}api/access.html{% else %}api-ref/access.md{% endif %}#about_oauth) ||
    || Authorization header | Authorization ||
    || Token type | OAuth ||
    || Content type | application/json ||
    || Request body |

    ```json translate=no
    {
        "queue": "QUEUE",
        "summary": "Subtask by comment",
        "description": "{{userComment.text}}",
        "parent": "{{issue.key}}"
    }
    ```
    **Parameter descriptions:**

    #|
    || **Parameter** | **Description** ||
    || `queue` | The key of the queue where the subtask will be created. ||
    || `summary` | The subtask summary. ||
    || `description` | The subtask description. The variable `{{userComment.text}}` is used here, which inserts the text of the user's last comment. ||
    || `parent` | The key of the parent issue. The variable `{{issue.key}}` inserts the key of the current issue. ||
    |#
    ||
    || Headers | Header: `X-Org-ID` or `X-Cloud-Org-ID`

    Value: Organization ID.

    <!-- source: en/_includes/api/org-id.md -->
    To get the organization ID, go to **Administration** → [**Organizations**](https://tracker.yandex.com/admin/orgs) and copy the value from the **ID** field. {#find-id}
    <!-- endsource: en/_includes/api/org-id.md -->

    ||
    |#

    {% endcut %}

2. Click **Create trigger**.

As a result, when a comment is added to an issue, a subtask will be automatically created in the specified queue, and its description will contain the text of the user's last comment from the ticket.

<!-- source: en/_assets/style/image.md -->
<style>

.yfm .border-yes {
    border: 1px solid #ccc;
}

.yfm .border-blue {
    border: 1px solid rgba(82, 130, 255, 0.5);
    border-radius: 10px;
}

</style>
<!-- endsource: en/_assets/style/image.md -->

[*issuekey]: An issue key is a unique identifier contained in the issue link. It consists of the queue key and a number, for example `TEST-123`.