Configure transitions between statuses in a workflow
In a workflow, you can use transitions to set up rules for changing issue statuses:
- Allow transitions from one status to another
- Set conditions for allowing transitions
- Add auto actions that are executed when the status changes
- Add a transition screen where you can fill in issue fields
The queue owner and users granted permission to access the queue settings can edit transitions in queue workflows.
If you want to add a transition for statuses that are not yet in the workflow, first add them to the process: How to add a status.
To avoid creating multiple transitions, you can allow transitions from any status in the status properties: How to allow transitions from any status.
Add a transition between statuses
To add a transition between statuses in a workflow:
-
In the left-hand panel, click Queues and select a queue.
-
In the top right corner of the queue page, click Queue settings.
-
Go to the Workflows tab and click the name of the workflow. The workflow visual editor will open.
-
Add a transition between statuses on the process diagram or using the menu:
On the process diagramVia the menuYou can add a transition right on the workflow diagram by connecting two statuses with an arrow:
-
Hover over a free spot on the block with the source status, click and hold the spot, and drag a line to a free spot on another status.
-
To change the entry or exit point of the transition, hover over the transition line near the point until the cursor turns into a cross with arrows, then drag the end of the line to the desired point.
-
To change the transition settings, select the arrow on the process diagram.

-
In the top panel of the workflow visual editor, click Add transition.
-
Fill in the Source status and New status fields with values from the lists.
-
-
If necessary, change the values in the Name, Name in English, and Identifier fields — the names and identifier are automatically generated based on the new (target) status name by default.
All transitions in the workflow originating from the same status must have unique identifiers. Otherwise, a problem message will appear in the top right corner, and you won't be able to save the workflow.
-
If necessary, configure the transition:
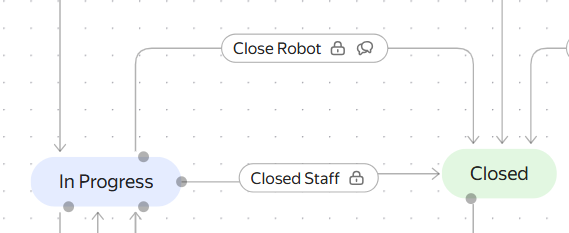
How to add multiple transitions between two statuses
If you need to execute different automations or show different transition screens depending on who is changing the issue status, you can set up multiple transitions with conditions for one pair of statuses.
For example, if employees are closing an issue, you need to show them a transition screen with mandatory resolution filling. If the issue is closed automatically on behalf of a robot, the transition screen should not be shown.
-
Add two transitions between statuses to the workflow diagram: one for employees, the second for the robot. How to add a transition
-
Configure conditions for the transitions:
- In the settings for the employee transition, add the condition Transition is performed by a user from the group and select the user group.
- In the settings for the robot transition, add the condition Transition is performed by a user from the list and specify the robot.
Transition settings
To configure a transition, select it on the diagram in the visual editor or in the status properties: How to configure a status.
Add auto actions
You can configure actions that Tracker will execute when an issue transitions to another status. This can include sending an email, changing issue parameters, setting a resolution, and so on.
To add an automation:
-
In the transition settings, open the section Automation and click Add automation.
-
Select the necessary automations from the list and configure them:
- Send email — send emails to specific employees or users performing roles in the issue (for example, the issue author or assignee).
- Add comment — leave a comment in the issue on behalf of a specific user (employee or robot).
- Set active sprint — add the issue to the active sprint on the selected board.
- Enter current time in field — record the time of the transition execution in the selected field.
- Enter sum of numbers in field — sum the contents of multiple fields and write the result to another field.
- Move or copy list of users to another field — move or copy users from one field to another.
- Remove user from followers — remove a user from the issue followers, for example, if the required information was received from them and further participation in the issue is not required.
- Fill in field — fill in a field in the issue. When setting up this type of automation, a filter by the type of value to be filled in the field will help you.
- Clear field content — remove the contents of any field in the issue.
- Unset resolution — if the issue was completed with a certain resolution, this resolution will be canceled.
If no suitable automation is found, you can set up a trigger: How do I set up a trigger?.
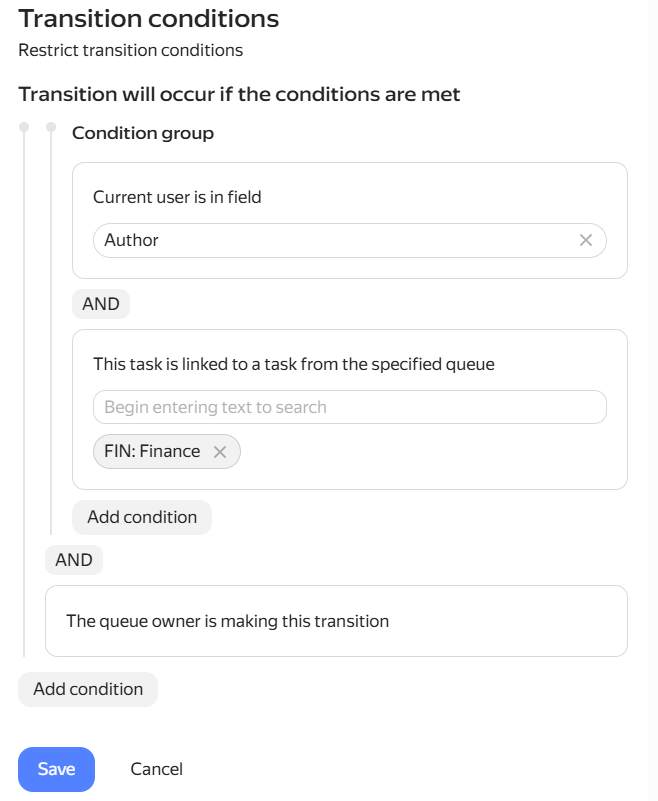
Configure transition conditions
You can configure conditions under which a transition can be executed. For example, allow the transition only for certain users.
-
In the transition settings, open the Transition conditions section and click Add condition.
-
Select the appropriate conditions from the list and configure them.
Available conditions
- The previous transition was from the status that this transition leads to.
- The issue is linked to an issue from the specified queue: enter the name or queue key.
- Transition is performed by a user from the group, including subgroups: the transition is allowed for users from the selected group, including its subgroups.
- User is specified in the field: the transition is allowed for users who are specified in the selected issue field.
- Transition is performed by the queue owner.
- Transition is performed by a user from the list: specify the users who are allowed to perform the transition.
If you add multiple conditions, by default the transition will be allowed only if all conditions are met simultaneously — the logical operator AND is applied to the conditions. For the trigger to fire when at least one condition is met, click the operator icon between the conditions; the OR operator will be selected.
-
To set more complex logic, you can group several conditions — conditions inside the group will be checked first, then the others. To do this, click Add condition below the list of conditions and select Add condition group from the menu. You can also select a logical operator for the conditions in the group: AND or OR.
Add a transition screen
The transition screen is a pop-up window that you can use to suggest the user to change certain issue parameters. For example, on the transition screen, you can ask the user to set a resolution, leave a comment, or record the time spent.
If you use the standard process or its copy, transition screens are already configured by default for transitions to the final status (for example, "Closed"), where the "Resolution" field must be filled in.
To add a transition screen:
-
In the transition settings, open the Transition screen section and activate the Enable transition screen option.
-
Configure the transition screen:
- Title — text in the header of the pop-up window.
- Title in English — text in the header of the pop-up window in the English interface.
- Fields on transition screen — select the fields that can be configured on the transition screen. Set default values for the fields if necessary. To make a field required for filling, select the checkbox to the right of the field.
- Add time spent — enable the option to add the time registration form to the transition screen.
- Add links — enable the option to add the form for creating links with other issues to the transition screen.
- Leave a comment — enable the option to add a comment field to the transition screen. To make the field required for filling, select the checkbox to the right of the field. You can also configure the comment parameters:
- Attach file — drag a file to the comment input area or click the icon.
- Invite user — click Invite and enter the login or name of the user you want to invite to the comment. You can invite multiple users at once.
-
Click Save.
Copy all transition settings
You can apply the settings of one transition to other transitions. You can copy all transition settings entirely or the settings of individual automations, transition conditions, or transition screens. The current settings will be replaced with new ones. To copy:
- Select a transition.
- In the transition settings, click , then select Copy settings to another transition or Paste settings from another transition.
- In the list, select a transition to insert or copy the settings to.
Copy individual transition settings
To copy individual transition settings:
-
Select a transition.
-
In the transition settings, select one of the sections:
-
Automation. In the automation settings, click , then select Copy automation to another transition or Paste automation from another transition.
-
Transition conditions. In the transition conditions settings, click , then select Copy conditions to another transition or Paste conditions from another transition.
-
Transition screen. In the transition screen settings, click , then select Copy screen to another transition or Paste screen from another transition.
-
-
In the list, select a transition to insert or copy the settings to.
Delete a transition
Make sure that after deleting the transition, there are no statuses that cannot be transitioned to.
-
Click next to the transition name.
-
Confirm the deletion.
An issue board is a visual representation of issues arranged in columns. Each column corresponds to a status, for example , , .
A resolution is an issue parameter that shows why an issue was closed. For example: Resolved, Won't fix, or Duplicate. You can add resolutions in the queue settings.
A queue key is a unique code for a queue consisting of Latin characters, for example TEST. The key is contained in the link to the queue and its issues, and you need to specify it in API requests and auto action settings. You can't change the key after creating the queue.
A robot is a service account that Tracker uses to perform automated actions in issues.
A status is an issue parameter that shows the current stage of the issue. For example , , .
A workflow is a set of issue statuses and rules for transitioning between them. You can set up multiple workflows in each queue.