Tracking the time it takes to process a request
To evaluate effectiveness of their support teams, companies measure their initial response time and the total time spent on request processing. The lower these indicators are, the faster are the user problems resolved.
To manage the response handling time in Tracker, configure SLA rules for your queue's issues. In the rule, you can specify the acceptable time allocated to resolve the issue and set up a timer to be started and paused on certain events: for example, when the issue is created, when its status changes, when an assignee is appointed, and so on.
Let's set up the SLA rules that will measure the support's initial response time and the total request processing time.
Initial response time
To measure the support's initial response time, set up a timer that will be started when an issue has been created and stopped when an employee has sent a comment or email from the issue page.
-
Go to SLA rules in the queue settings and click Create rule.
-
Set the rule's name (by default, it's named New SLA rule) and choose Work schedule so that the timer is only active during business hours.
-
Under Issue groups that meet the rule, and the time to respond, you can create different groups of issues in the queue, each with its own deadline:
-
Enter a name for the group in the New issue group field.
-
Set the time limit for the first response in the Time until expiration field. For example, if you want to set the time to 2 hours and 30 minutes, write
2h 30m. -
In the Time until warning field, choose a time limit which triggers an automatic email reminder after expiring.
If you want different issue groups to have different time limits, click Add issue group and enter other time values for the new group.

-
-
If you want to automatically email the employee responsible for the issue once the first response time has expired, under Time limit notifications → Missing a deadline, select Send email and specify that employee's name or username. Alternatively, you can send a message as follows: under Time limit notifications → Missing a deadline, select By Yandex Messenger and enter the employee data.
-
Set up the criteria for starting and stopping the timer.
-
Under Start, add the condition Issue created.
-
Under Stop, add the condition Received response from queue team.

-
-
Save the rule.
Now, when an issue has been created in the support queue, a timer will get started. It will count down until a support staff member from the queue team sends a comment or email from the issue page.
Total request processing time
If you want to measure the total request processing time, set up a timer that triggers when an issue is created and stops once the issue status is updated to Closed. You can pause the timer while the issue is in the Need info status so that the waiting time is not counted towards the total processing time.
-
Go to SLA rules in the queue settings and click Create rule.
-
Set the rule's name and choose Work schedule so that the timer is only active during business hours.
-
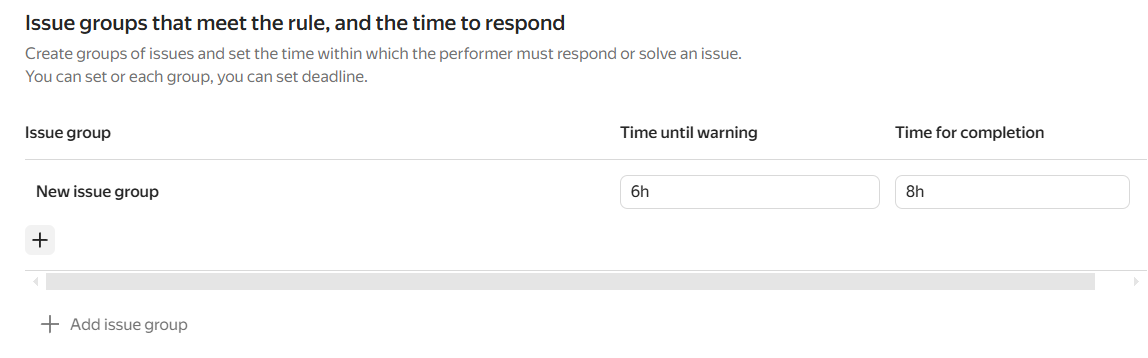
Under Issue groups that meet the rule, and the time to respond, you can create different groups of issues in the queue, each with its own deadline:
-
Enter a name for the group in the New issue group field.
-
Set the time limit for resolving the issue in the Time until expiration field. For example, specify
8hif you want the limit to be 8 working hours. -
In the Time until warning field, choose a time limit which triggers an automatic email reminder after expiring. For example, specify
6hif you want the limit to be 6 working hours.
If you want different issue groups to have different time limits, click Add issue group and enter other time values for the new group.
-
-
Under Time limit notifications, set up notifications that trigger once the time limit expires:
-
If you specified the warning time limit under Timeframes for issues, choose Email in the Warnings field and specify the name or username of the employee responsible for the issue. This way, they will receive a notification once the set time limit expires.
-
If you want to automatically email the employee responsible for the issue once the resolution time limit has expired, under Missing a deadline, select Email and specify that employee's name or username.
-
Apart from sending an email, you can send a message as follows: under Time limit notifications → Missing a deadline or Warnings, select By Yandex Messenger and enter the employee's credentials.
-
-
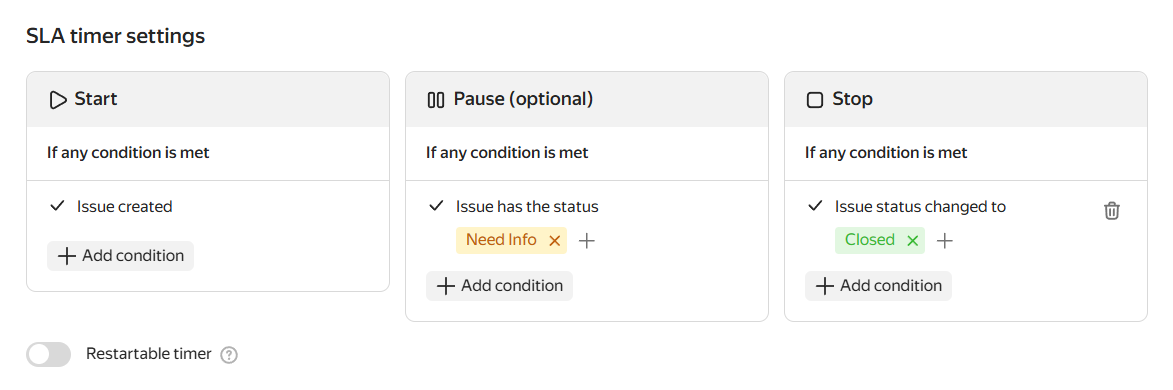
Set up the criteria for starting and stopping the timer.
-
Under Start, add the condition Issue created.
-
Under Pause, add the condition Issue has the status → Needs info.
-
Under Stop, add the condition Issue status changed to and select the Closed status.
-
-
Save the rule.
Now, when an issue has been created in the support queue, a timer will get started. The timer will be active until the issue status changes to Closed. If the support agent asks the user to provide additional information and updates the issue status to Need info, the timer will pause and can only resume after the issue status changes.