Yandex Messenger
Let's assume that you need to automatically send notifications to the messenger whenever an issue changes its status. You may need it to see when your releases are ready for testing. To do this, create a trigger that will keep track of Release issue statuses and send an HTTP request when the issue status changes to Ready for testing.
To send notifications from Tracker to Yandex Messenger, you will need a robot account to be used for sending messages. Register your robot in Yandex Messenger, add it to a chat, and set up a trigger that will send messages through the robot via HTTP requests.
Step 1. Register your robot in Yandex Messenger
-
If you do not have a robot account that you can manage, create a new robot.
-
Log in to your robot account at https://passport.yandex-team.ru.
-
Get the robot's authorization token for Yandex Messenger by following this link under the robot's account: https://oauth.yandex-team.ru/authorize?response_type=token&client_id=f45aca80c81144dd95dc150319c327a3
Copy the token that appears on the next page and save it. -
To register your robot in Yandex Messenger, send a POST request to
https://bp.mssngr.yandex.net/team/register/using the token received in the header:curl -X POST 'https://bp.mssngr.yandex.net/team/register/' -H 'Authorization: OAuthTeam <OAuth_token>'
Step 2. Add your robot to a chat
-
Add your robot to the Yandex Messenger chat you want to send Tracker notifications to.
-
Once the robot is added, send any message in the chat.
-
Get a chat ID that you will need to send notifications from Tracker:
-
Open the web version of Yandex Messenger and find your chat.
-
On the chat page, go to the address bar. You will see a chat URL, e.g.:
https://q.yandex-team.ru/#/chats/0%2F0%2F3d0c333b-f333-33d3-b333-d3aa******** -
Copy the last part of the URL and replace
%2Fwith a forward slash (/). You will get a chat ID, e.g.:0/0/3d0c333b-f333-33d3-b333-d3aa********
-
Step 3. Set up a trigger in Tracker
-
Log in to Tracker. You must have administrator privileges for the queue for which you want to configure the trigger.
-
In the left-hand panel, click Queues and select a queue.
-
In the top right corner of the queue page, click Queue settings.
-
In the left panel, select Automation.
-
In the top right corner, click Create → Trigger.
-
Name the trigger, e.g., Yandex Messenger notifications.
-
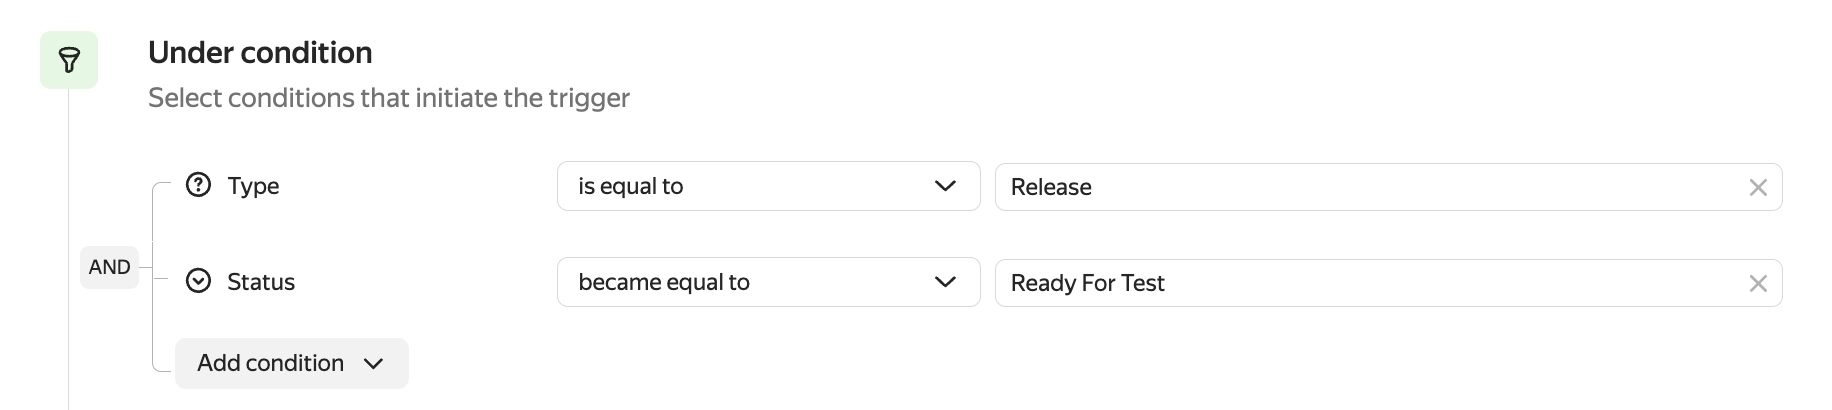
Configure trigger conditions so that the trigger is fired when the status of a Release issue changes to Ready for testing:
-
Add the condition: Type → Field equals to → Release.
-
Add the condition: Status → Field value became equal to → Ready for testing.
-
Be sure to put the AND logical operator to the left of the condition group for the trigger to fire if the conditions are met at the same time.
-
-
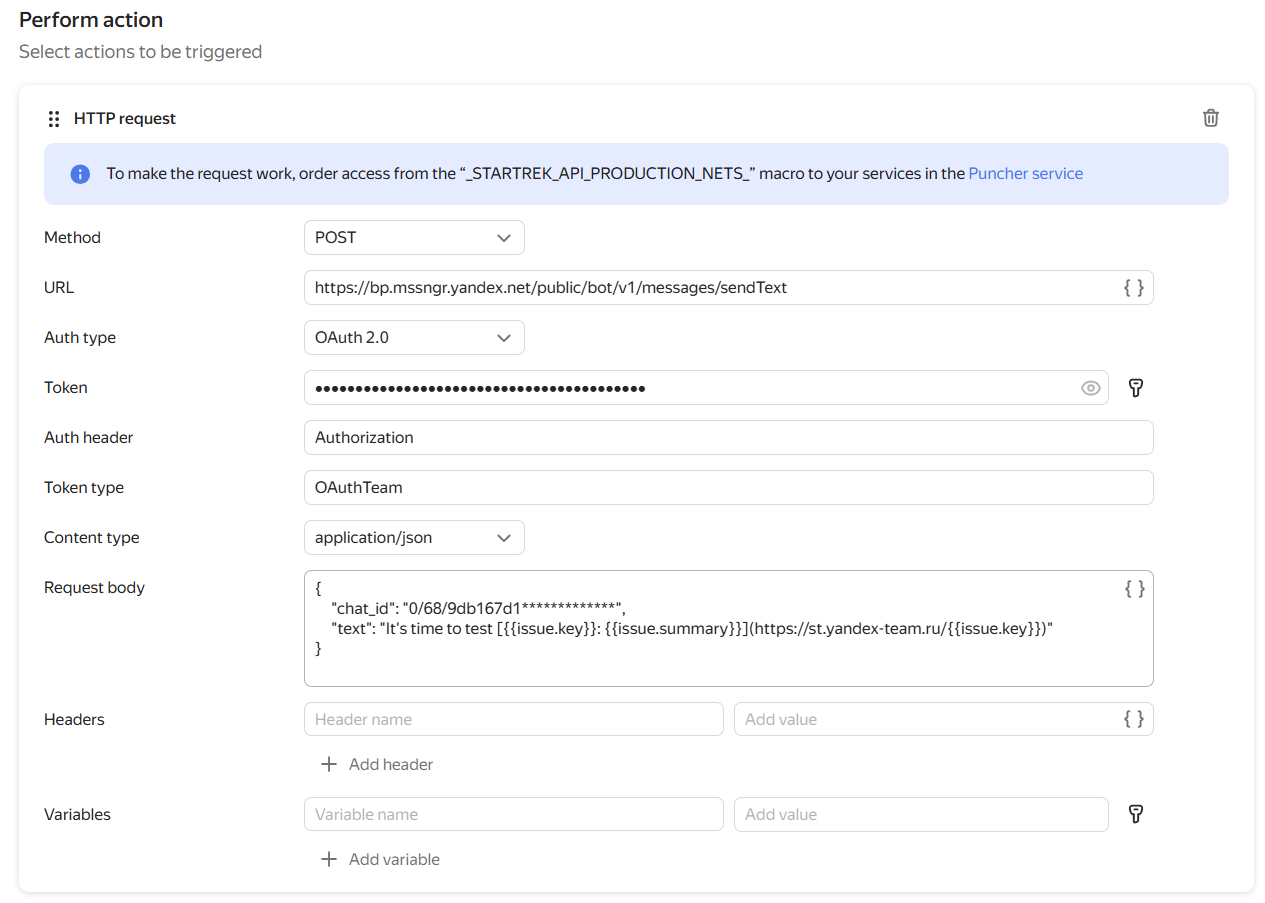
Set the actions for the trigger:
-
Click Add new action and choose HTTP request.
-
Set up the request:
- Method: POST.
- URL:
https://bp.mssngr.yandex.net/bot/sendMessage/ - Authorization method: OAuth 2.0.
- Token: Token value you received when registering your bot.
- Token type:
OAuthTeam. - Content type: application/json.
- Request body:
As the
{ "chat_id": "<chat_ID>", "text": "Time to test the issue [{{issue.key}}: {{issue.summary}}](https://st.yandex-team.ru/{{issue.key}})" }chat_idparameter value, specify the chat ID from the chat URL.
To add the issue field values to the request body, click { } to the right of the field and choose the field name. - Leave the headers empty.
-
-
Save your trigger.
To test the trigger in action, change the issue status from **Release **to Ready for testing. The trigger will send a message to Yandex Messenger saying: Time to test the TEST-123 issue: Configure triggers.