Setup in Windows
Setting up DoH on Windows 11
Warning
The DoH protocol is available only for Windows 11.
-
Navigate to Start → Settings → Network & internet → Wi‑Fi or Ethernet, then select <Wireless_network> properties if you're using Wi‑Fi.
-
Under DNS server assignment, click Edit → Manual and enable IPv4.
-
In the Preferred DNS and Alternate DNS fields, enter the primary and secondary IPv4 addresses for your selected operating mode:
Mode
IPv4
Basic
Primary:
77.88.8.8Secondary:
77.88.8.1Safe
Primary:
77.88.8.88Secondary:
77.88.8.2Family
Primary:
77.88.8.7Secondary:
77.88.8.3 -
Configure DNS encryption (DoH) by following the steps for your Windows version.
Tip
To check your version number on Windows 11, type
winverin the search bar and press Enter. This opens a window with information about your current system version.Version 21H1Version 21H2 and aboveFor each DNS server, select your desired option in the Preferred DNS encryption field:
- Unencrypted only: Use standard DNS without encryption.
- Encrypted only (DNS over HTTPS): Use DoH only.
- Encrypted preferred, unencrypted allowed: Attempt to use DoH and fall back to unencrypted DNS if DoH isn't available.
For each DNS server, in the DNS over HTTPS field, select On (manual template) and specify the DoH template corresponding to your selected operating mode.
Mode
DoH template
Basic
https://common.dot.dns.yandex.netorhttps://common.dot.dns.yandex.net/dns-querySafe
https://safe.dot.dns.yandex.netorhttps://safe.dot.dns.yandex.net/dns-queryFamily
https://family.dot.dns.yandex.netorhttps://family.dot.dns.yandex.net/dns-query -
Apply your changes and verify that encryption is active.
Testing
Verify that DNS traffic is encrypted using Packet Monitor (Pktmon), the network diagnostic tool included in Windows:
-
Open Command Prompt or PowerShell as an administrator.
-
Run the following command to clear any existing network traffic packet filters in Pktmon:
pktmon filter remove -
Add a filter for DNS port 53:
pktmon filter add -p 53 -
Activate real-time monitoring:
pktmon start --etw -m real-timeCommand Prompt should output all port 53 packets. If DoH is enabled, nothing will appear because Windows is routing DNS requests over HTTPS instead of port 53.
If the output shows traffic on port 53, it means that DoH isn't configured properly. Check your DNS server settings and verify that the servers support DoH.
Windows 11
-
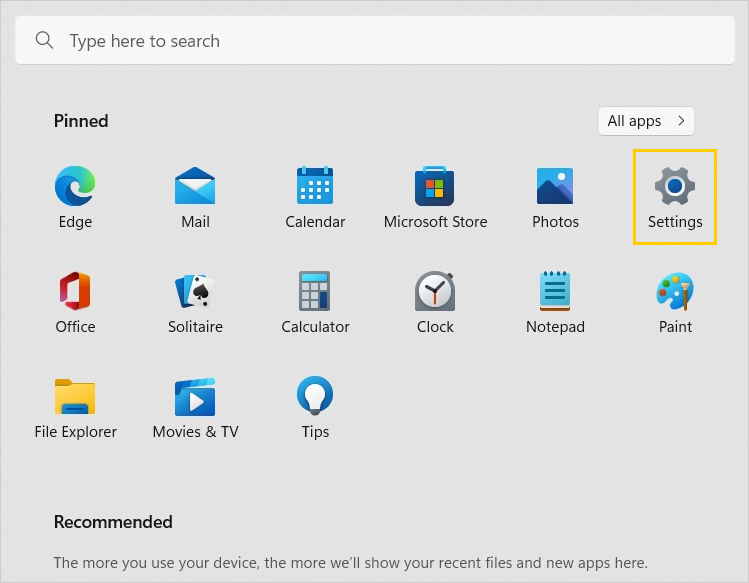
Open the Start menu and select Settings.
-
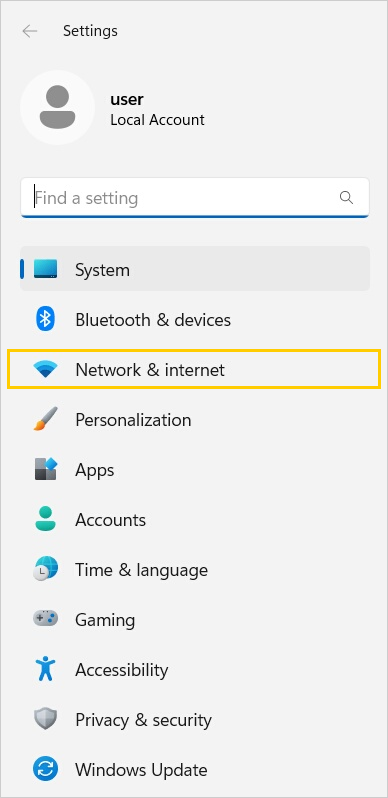
In the side menu, select Network & internet.
-
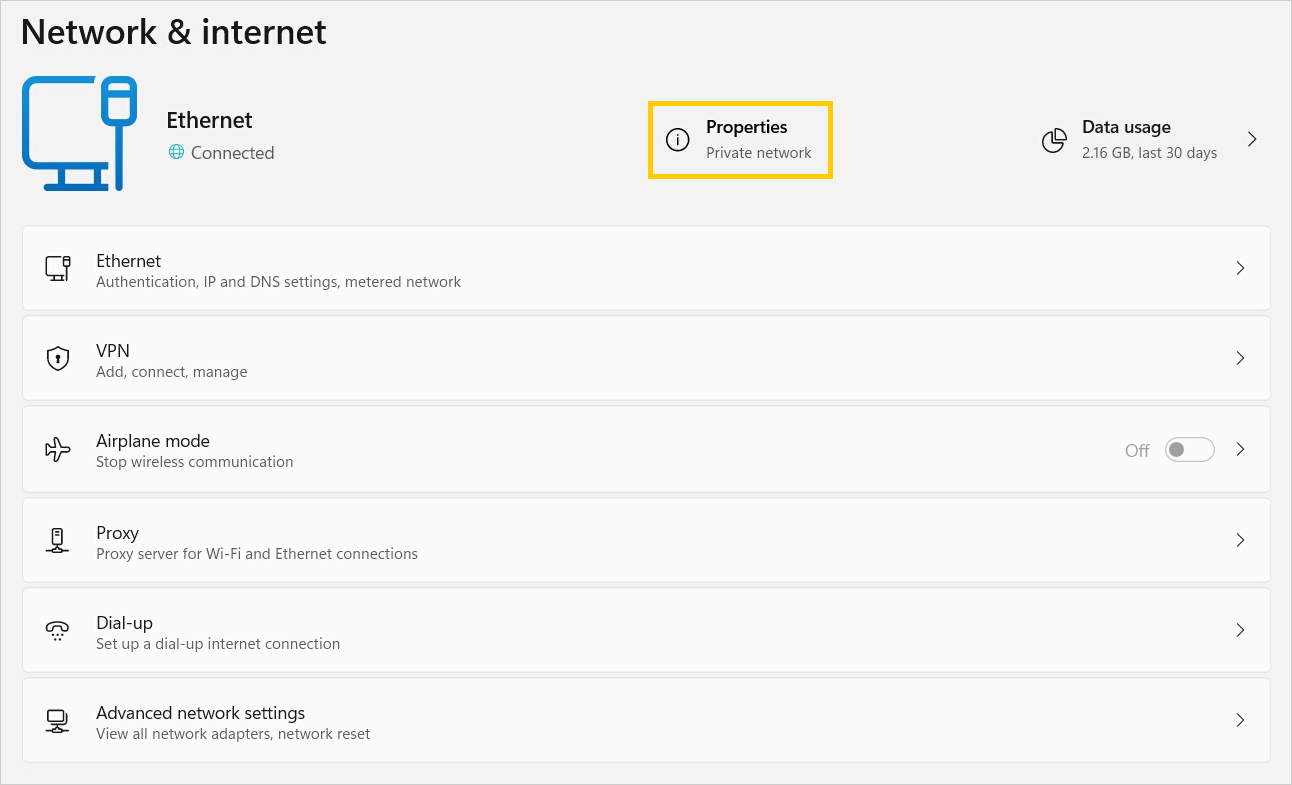
Select Properties.
-
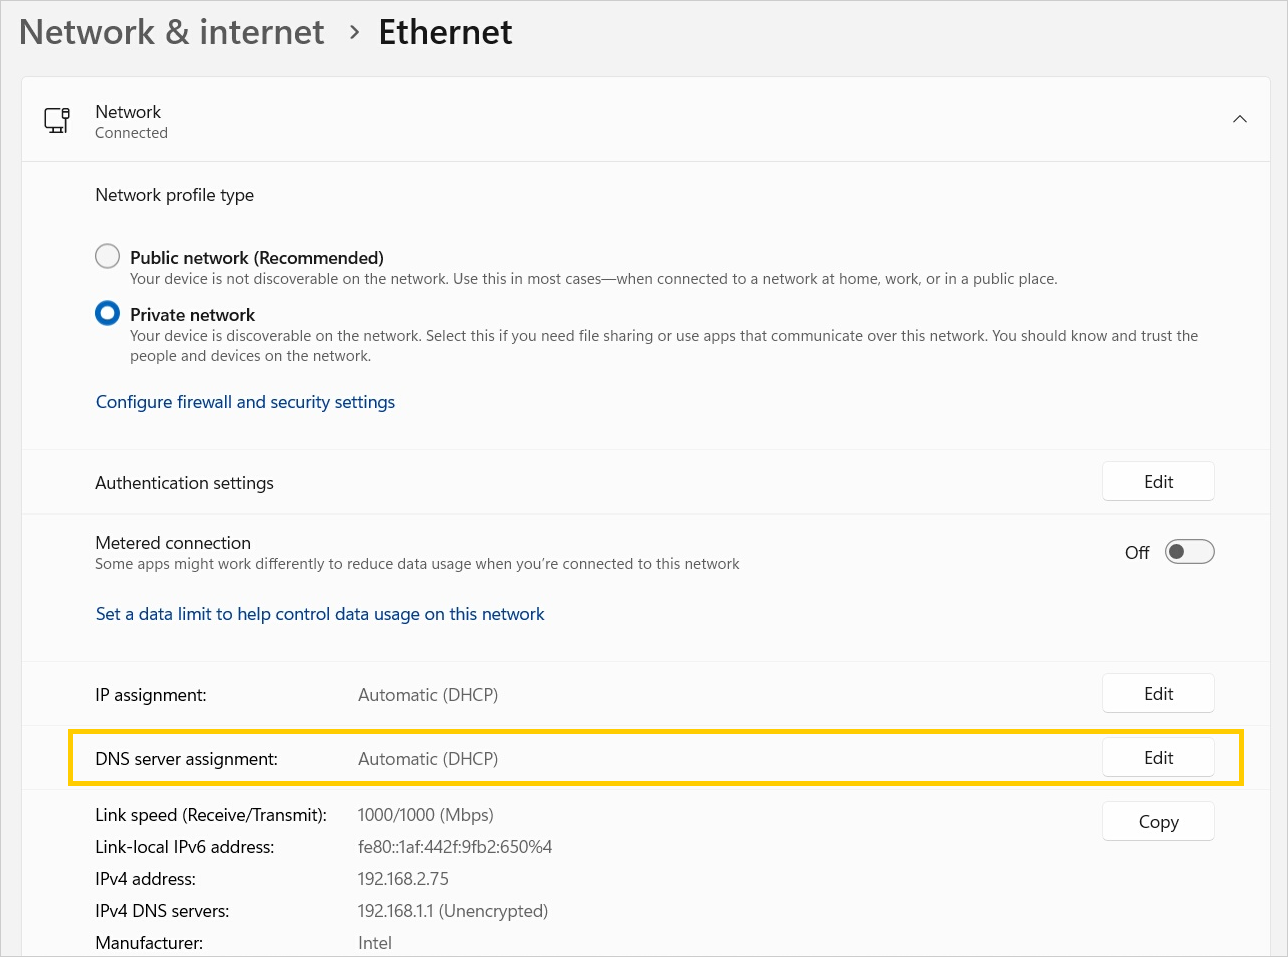
Next to DNS server assignment, select Edit.
-
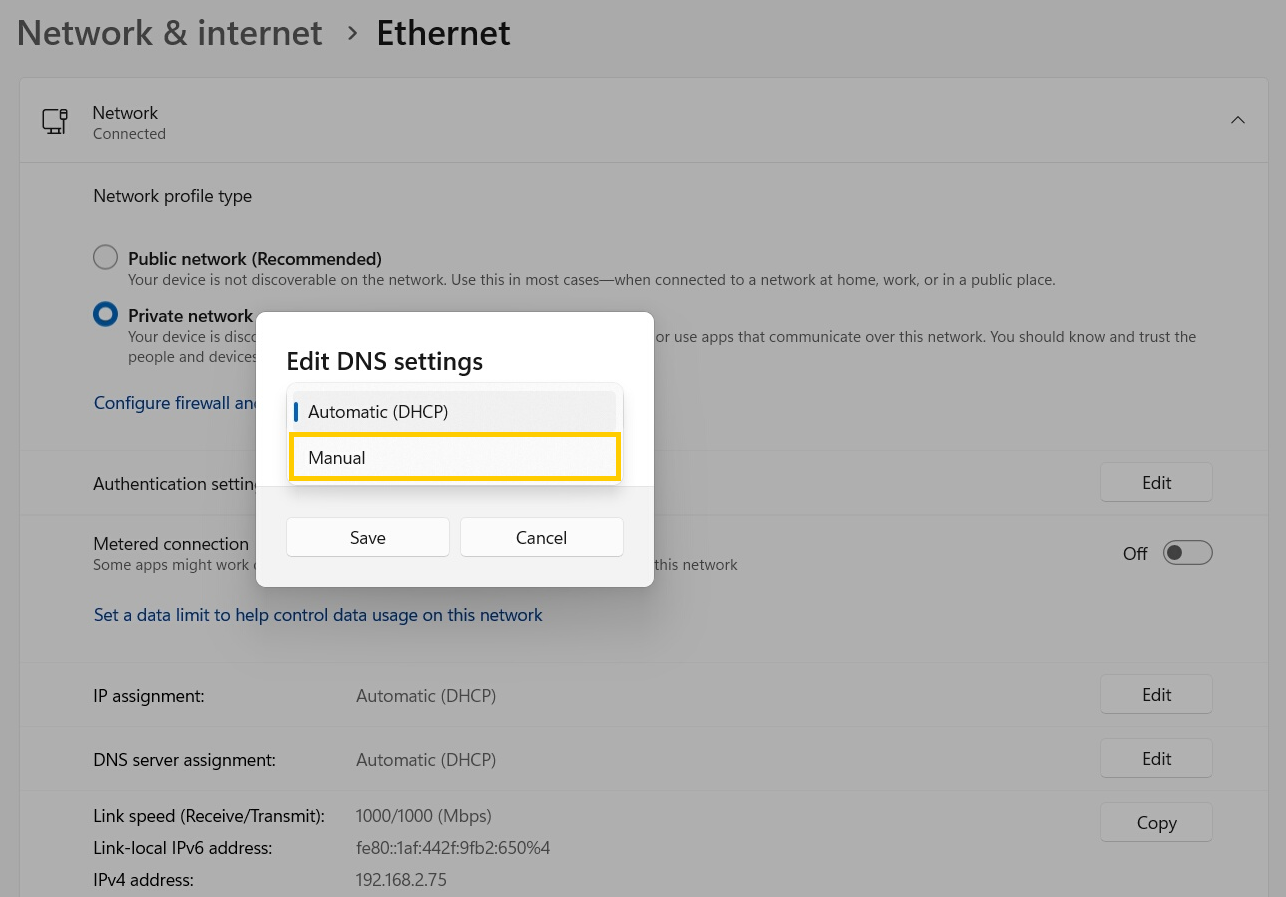
In the window that opens, select Manual.
-
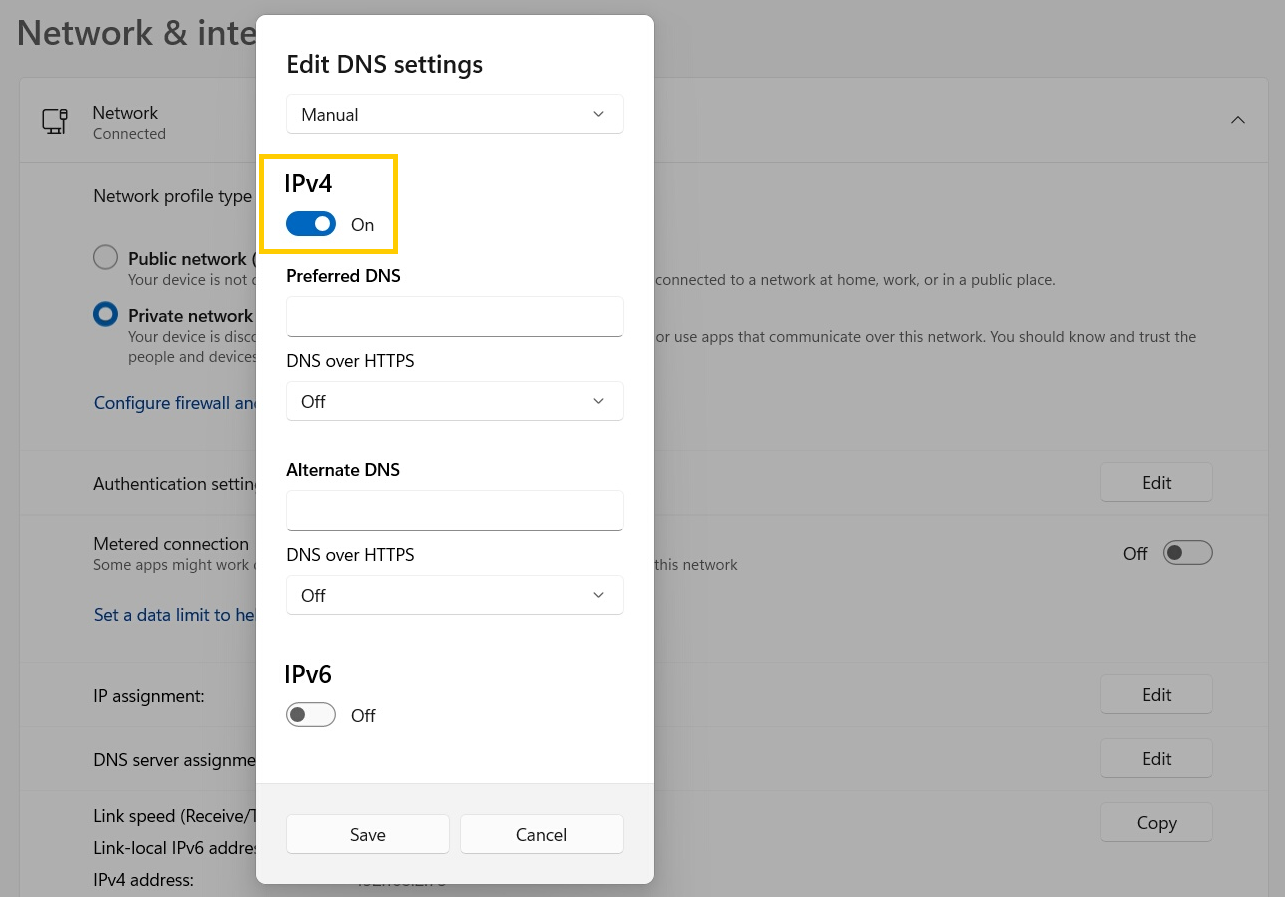
Select the protocol version you're using.
-
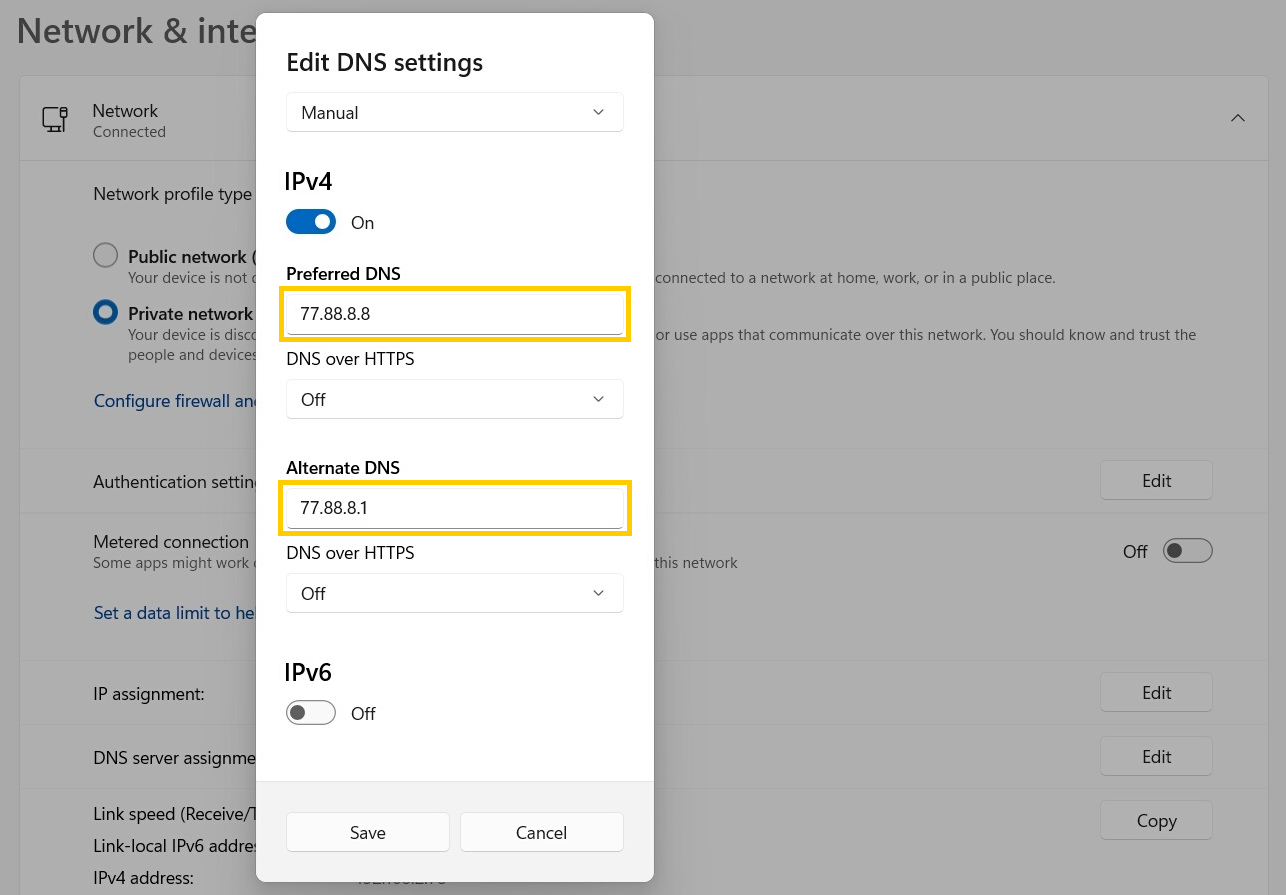
In the Preferred DNS and Alternate DNS fields, enter the IP addresses of the DNS servers that you selected.
Windows 10
-
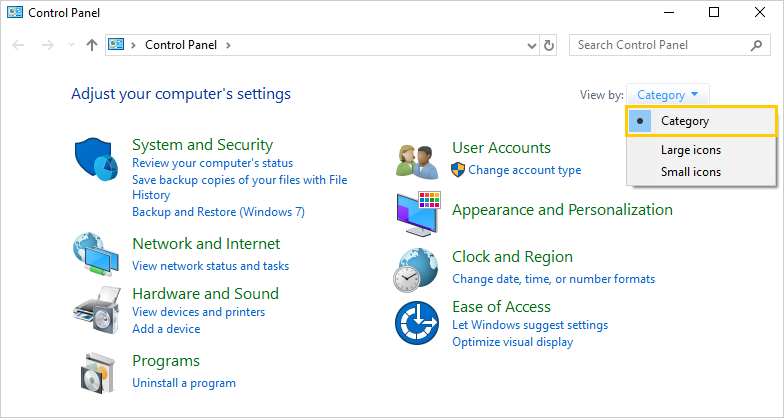
In the search box on the taskbar, type
control paneland select the Control Panel in the results. -
Under View by, select Category.
-
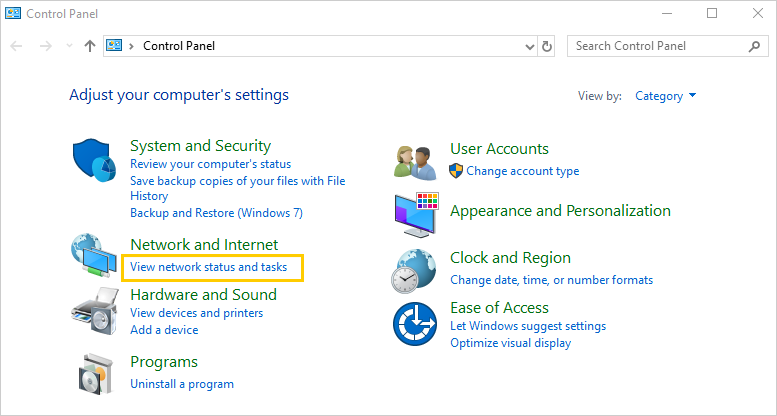
In the Network and Internet section, click View network status and tasks.
-
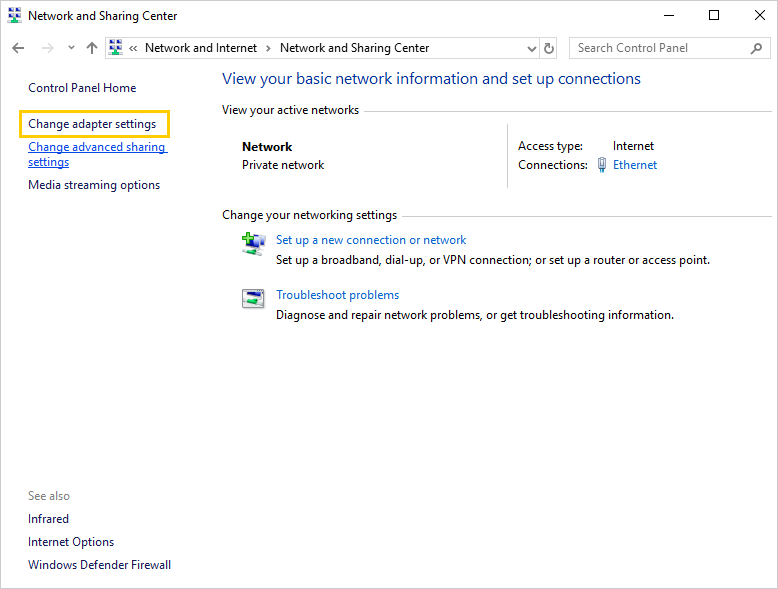
Click Change adapter settings.
-
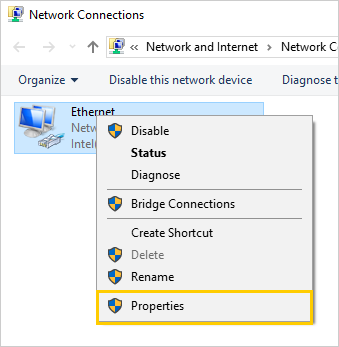
Right-click your network connection, then select Properties.
-
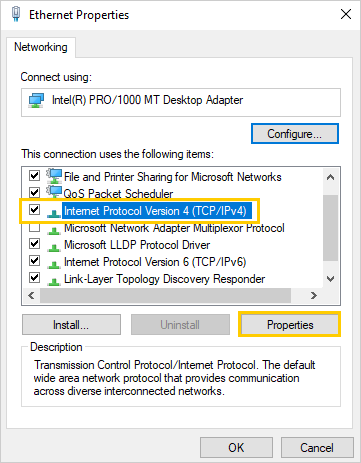
Click Internet Protocol Version 4 (TCP/IPv4) → Properties.
-
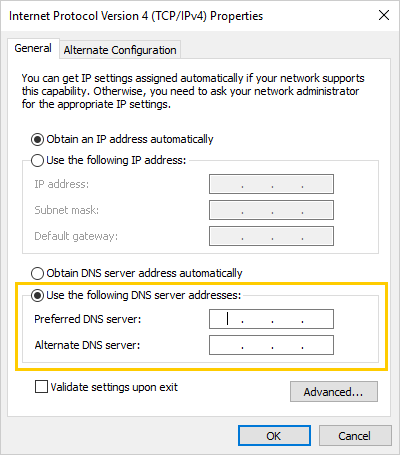
Enable the option Use the following DNS server addresses.
-
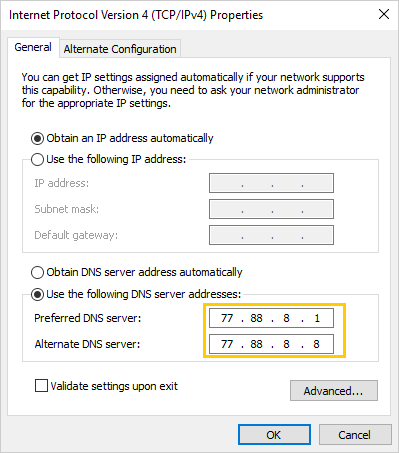
In the Preferred DNS server and Alternate DNS server fields, enter the IP addresses of the DNS servers that you selected.
Windows 8 or 8.1
-
Swipe left from the right edge of the screen or move the mouse pointer to the upper-right corner of the screen and then down. Click Search. In the search box, type
control paneland select the Control Panel in the results.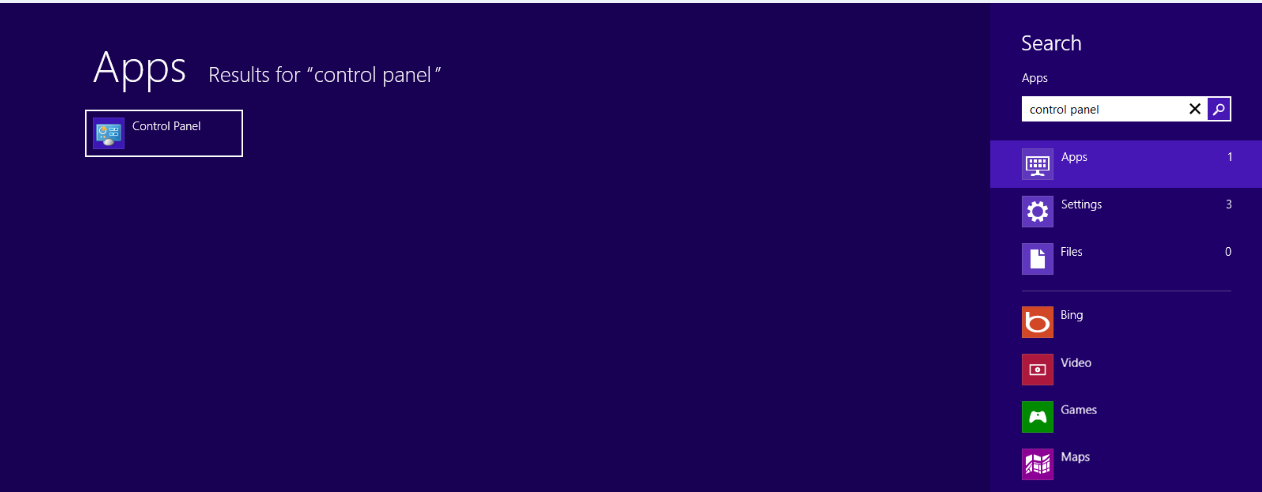
-
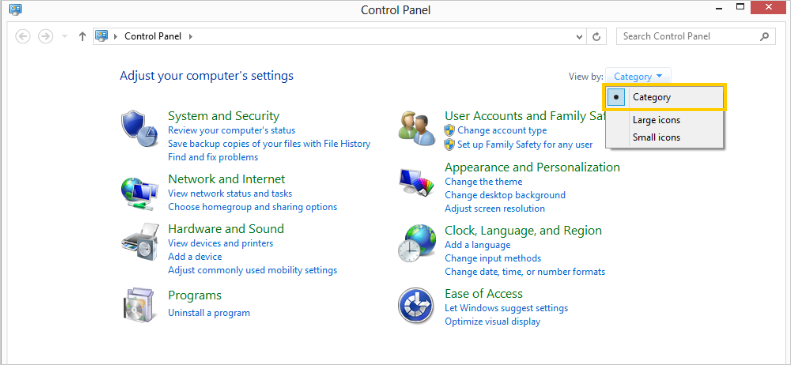
Under View by, select Category.
-
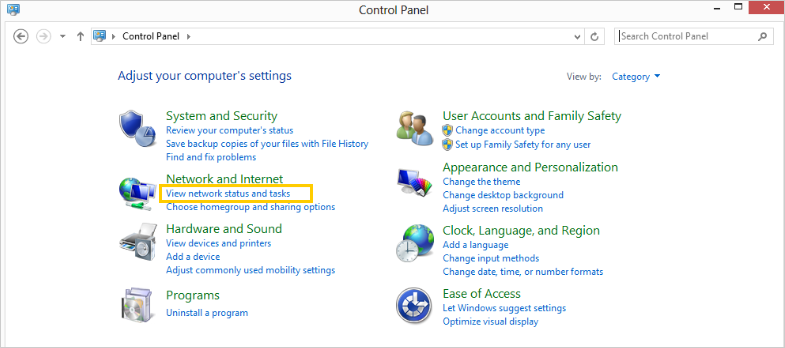
In the Network and Internet section, click View network status and tasks.
-
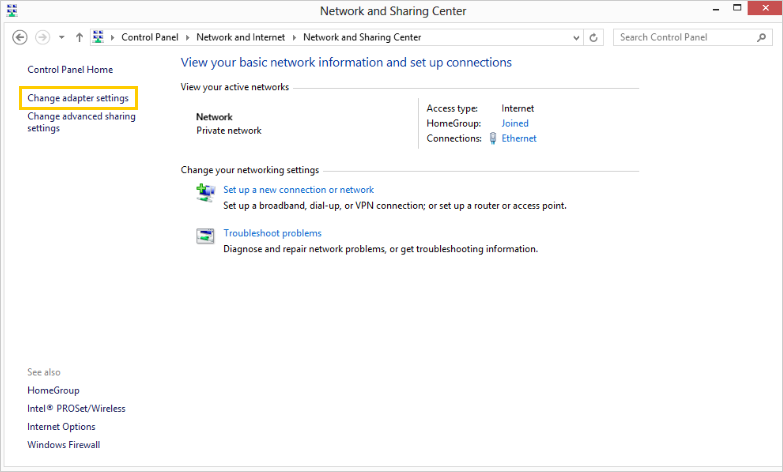
Click Change adapter settings.
-
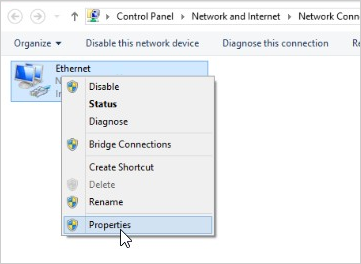
Right-click your network connection, then select Properties.
-
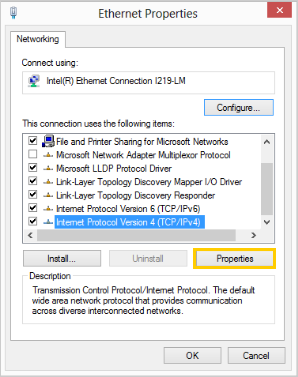
Click Internet Protocol Version 4 (TCP/IPv4) → Properties.
-
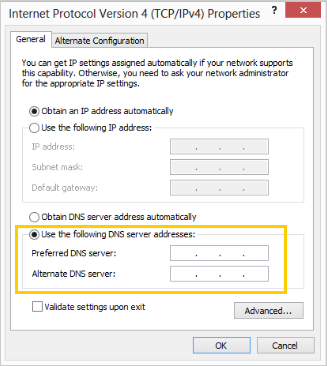
Enable the option Use the following DNS server addresses.
-
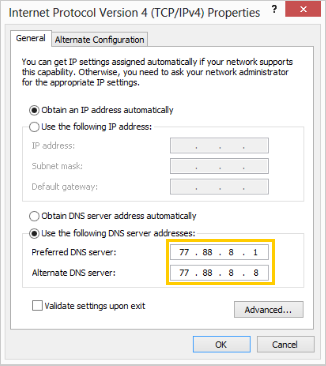
In the Preferred DNS server and Alternate DNS server fields, enter the IP addresses of the DNS servers that you selected.
Windows 7
-
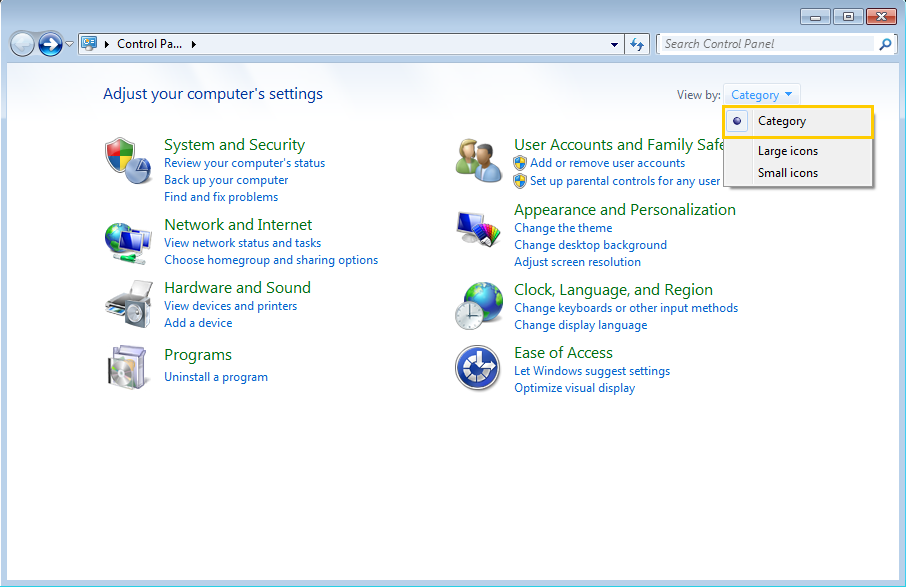
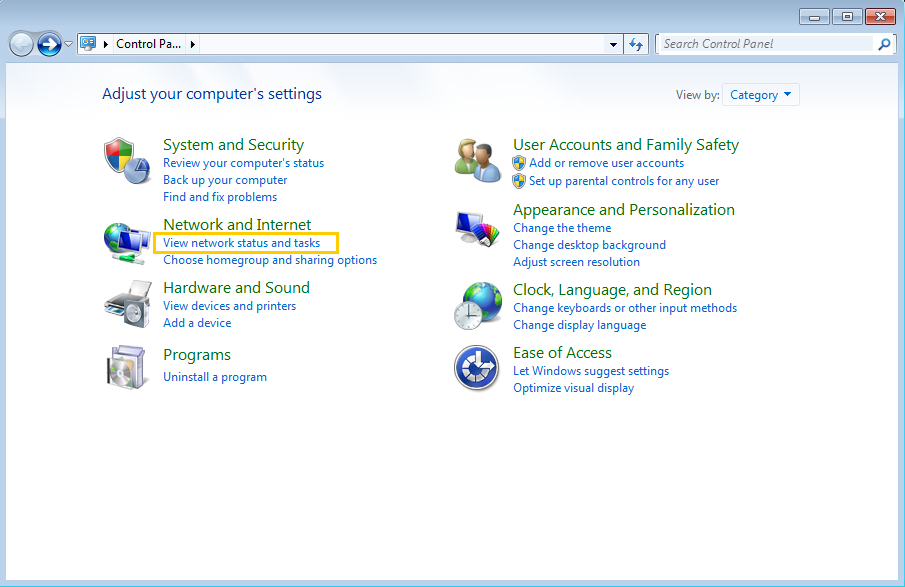
Click Start → Control Panel. Under View by, select Category.
-
In the Network and Internet section, click View network status and tasks.
-
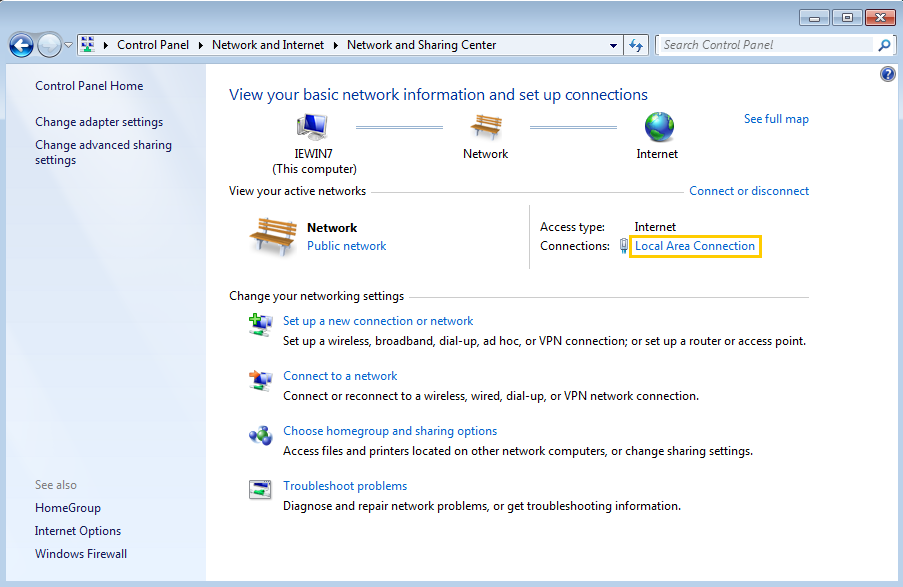
Under View your active networks, click the link next to Connections.
-
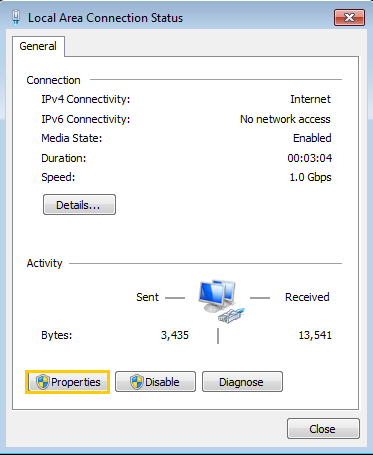
Click Properties.
-
Click Internet Protocol Version 4 (TCP/IPv4) → Properties.
Note
If your operating system is password-protected, enter the administrator password.
-
Enable the option Use the following DNS server addresses.
-
In the Preferred DNS server and Alternate DNS server fields, enter the IP addresses of the DNS servers that you selected.
Windows XP
-
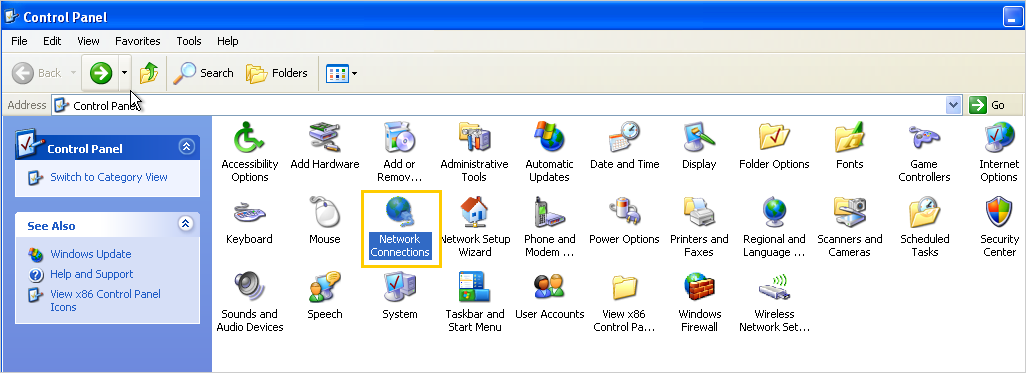
Click Start → Control Panel → Network Connections.
-
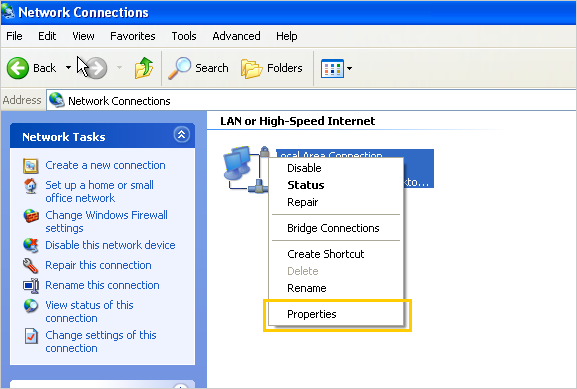
Right-click your network connection, then select Properties.
-
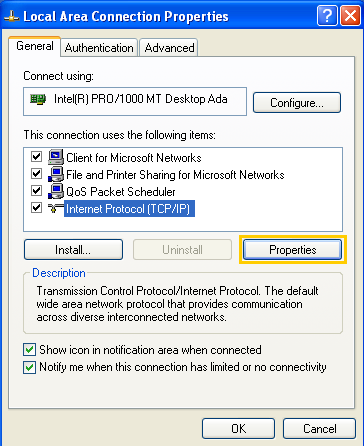
Click Internet Protocol (TCP/IP) → Properties.
-
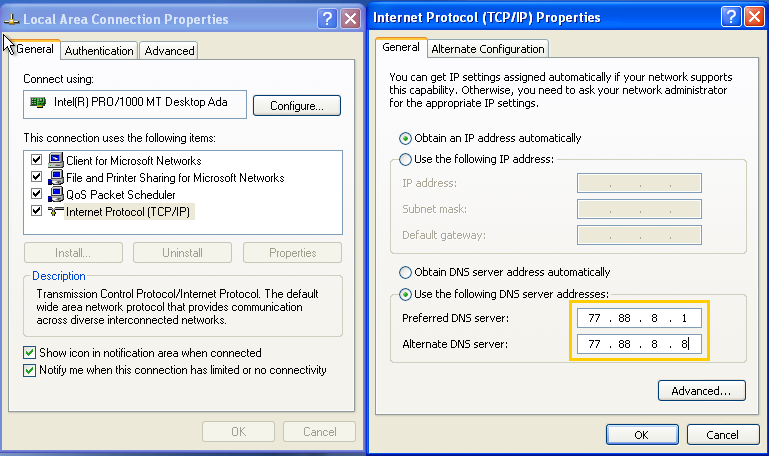
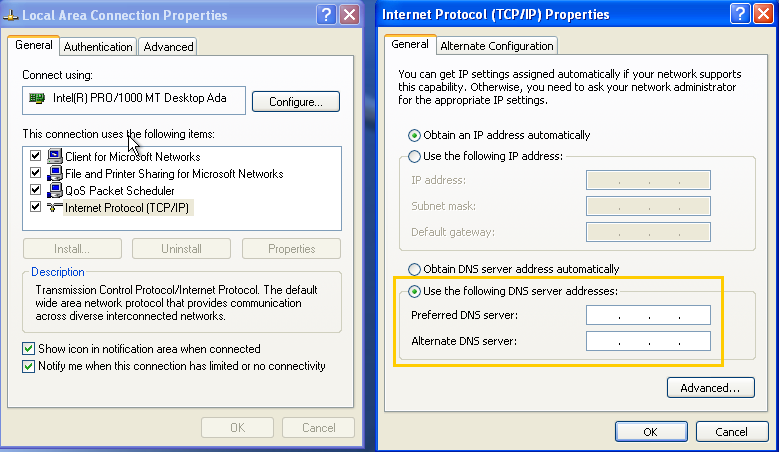
Enable the option Use the following DNS server addresses.
-
In the Preferred DNS server and Alternate DNS server fields, enter the IP addresses of the DNS servers that you selected.